WELCOME!


Powered by IP2Location.com

Monday, April 28, 2008

Masala Paav - Paav bhaji in a different form.....:)

" Masala pav is a spicy blend of tomato onion gravy cooked and stuffed inside butter laden pavs.Every pav bhaji vendor serves his own version of Masala Pav so that each one tastes different but equally delicious. Very often the pav bhaji gravy is tossed with pieces of pav and served with a slice of lemon.It is a spicy way to serve bread. Quick and easy!"

This is the only information I found about this Masala Paav when I tried to search its origin. Guess its the brain child of the Chaat and Paav bhaji vendors...who came up with this amazing say of serving paav. I always make this dish for lunch...whenever I make paav bhaji for dinner the previous night. Yeah, this is a dish i make next day just to make the leftover a bit interesting. I somehow feel bored to eat the same thing for the next day. I guess there are many who will nod there heads to this. Right? Who likes to eat the same thing again and again... I dont. So Iam always searching for new recipes and way to make the leftovers interesting.

I ate masala paav for the first time in Grant road, Mumbai.... in a Paav bhaji joint named "Sardaar Paav bhaji Centre". Ohh it was so awesome. That when I came to know that a dish like this existed. It is so easy to make. You can find this dish in any of the paav bhaji joints or paav bhaji "thela" /stalls in mumbai. I simply relish it. Hope u all like it too. :D

Okie... I always make this dish as a leftover.... but u may make and serve it as a different way to serve Paav bhaji...:)

This looks so good... I kept clicking snaps... hmmmm.... lovely and tasty Masala Paav... hmm okie now here goes the recipe.

You need :

Hamburger bun : 4

Onion - 1 medium chopped

Tamarind chutney (optional ) - 1/2 cup

Coriander leaves

Lemon juice - 3 tsp

Paav bhaji (leftover ) - 3 cups ( you can find the recipe for the bhaji here )

Nylon sev - 1 cup


Method :

Butter both the sides of the hamburger buns and then roast it on the tava. Once the bun becomes golden brown on either side. Place the buns on the plate. Keep the base bun on the plate and spread the ( paav bhaji ) Bhaji over it. Now put some spoons of the tamarind chutney to it. This is optional, and you may avoid it. The masala paav yet tastes lovely. Now sprinkle the chopped onions and the freshly chopped coriander on it and cover it with the other bun. Spread butter on the top bun and then spread some more paav bhaji masala over it. Garnish with nylon sev, few drops lemon juice and coriander leaves. Serve it hot. this can be eaten with a spoon. Enjoy!

My hubby relishing the Masala Paav !

Serve hot as Dinner / Lunch or as a snack. No side needed. Its a complete meal in itself....:) Enjoy!


Semiya Payasam to celebrate my award...:)

I love sweets...but as my hubby isnt a sweet-o-holic, I dont often make sweets at home. But today was a day for celebration..... Celeberating my first award, I just made a small cup full of semiya payasam. Just sharing my happiness with you all....with a sweet dish and a nice recipe.

You need :

Roasted Vermicelli (semiya) - 1/2 cup
Milk - 2 cups
Elaichi (cardamom) - 5-6
Roasted Cashew nuts - 8-9
Ghee - 2 tbsp
Sugar - 3/4 cup


Method :
n a pan add the ghee and add the roasted vermicelli to it and mix for a minute or so. Now,take around 1 1/2 glass of water and cook the roasted vermicelli. Once the vermicelli is nicely cooked and the water is somewhat drained. Add the milk and mix well. Add the cruched cardomom powder to it and mix well. Stir inbetween and allow the milk to come to a boil. Add the sugar and mix well. You may add evaprated milk instead of milk for more flavour and fast cooking. Let the payasam thicken a bit. Add the roasted cashew nut and serve hot ot chilled.


Enjoy this lovely sweet dish for any ocassion. Serve hot or Chilled. I like it Chilled. Enjoy!

Friday, April 25, 2008

Avacado and Tofu Chutney - from Vaishali's kitchen to mine.


Now as I said earlier I am dedicating a seperate post for this lovely chutney/ dip recipe.
I found this recipe at vaishali's blog and it immidiately caught my attention.I had to try this recipe then and there and luckily, I had all the needed ingredients needed for this chutney and voila!!... I had a tasty chutney as a side to my crunchy mysore masala dosa.


I made few changes to the original recipe. I grinded the coriander leaves too along with the other ingredients. You can find the original recipe here. This chutney, well u can also call it as a dip, as it is tangy and so flavourful. You can have it as an amazing dip rocking you get together or party. So here goes the recipe, and my changes to the recipe.


Ingredients :

Ripe Avacados - 2 small Pitted and scooped
Tofu - 1 1/2 cups
Ginger - 2 tsp finely chopped or grated
Green chillies - 2 chopped
Fresh coriander - 1/2 cup
salt to taste
Lemon extract - 1 tbsp


Method :

In a blender combine all the ingredients and blend until nice and smooth. Transfer to a nice serving bowl and garnish with freshly chopped coriander if desired. Your tasty, tangy chutney/Dip is ready. Enjoy!!

Thanx vaishali for the amazing recipe i am so sure I will be making it again.


Serve with hot dosas or vadas. Or as a dip for vegetables. Enjoy!!

Wednesday, April 23, 2008

Garlicky Spinach And Mushroom Pasta


Pasta is something we make often. Me and my hubby both love italian food a lot, specially pasta, which tops the list. I like my pasta spicy or like how we get in California pizza kitchen, something like an indian style pasta. Lotsa garlic and lotsa spice. Yuummmmmmmmmmmm!!
So this is my style pasta.....basic oil based garlicky pasta. As i said earlier, in my previous pasta and italian posts that I like my sauce seperate to make my pasta less soggy, So this is a sauceless pasta. You may add sauce to it if u desire and enjoy this lovely Garlicky mushroom spinach pasta.


Ingredients :

Angel hair (spaghetti ) - 1 packet
Spinach - 1 1/2 cup (I used frozen spinach)
Mushroom - 7-8 sliced (divide in 2 parts (1/4 and 3/4 ))
Garlic pods - 1 medium chopped
Oregano - 1 tbsp
Salt to taste
Olive oil - 1 tbsp (add more if u feel ur pasta looks dry or sticky)
Fresh italian / indian parsley (coriander) - 1/2 cup finely chopped
Red chilli flakes - 1 tsp
Sun dried Tomatoes - 5-6 sliced (optional)
Chilli Garlic Paste - 2 tsp (recipe below)


Garlic Chilli Paste Recipe

Ingredients:

Dried red chillies - 6-7
Garlic pods - 6-7 (chopped)
Olive oil - 1/2 tbsp
Salt to taste

Method:
In a blender add all these ingredients and blend them well into a paste.Your Garlic chilli paste is ready. Keep it aside.You can store it in an air tight jar and keep it in the refridgerator for a week.


Method :

In a big pan heat around 9 cups of water. let the water boil and add salt and few tsps of olive oil to the water. when the water starts boiling, add the pasta to the water and allow it to cook a bit (Al Dante). See that u dont overcook ur pasta.Once cooked drain the excess water and allow the pasta to cool well. Keep it aside.

In a pan take some oilive oil and saute the spinach sperately and keep it aside once cooked. Now in the same pan take some butter and saute 1/4 cup of the sliced mushrooms. Allow the mushroom to cook well and fry. Keep aside.

In a seperate pan now take olive oil and add the chopped garlic to it. Saute well and then add in the garlic chilli paste to it. Mix well for few minutes. Now add in 3/4 of the sliced mushrooms and fry well. Once the Mushrooms are cooked well, add the spinach to it and mix well. Add the pasta to it and saute well. Add some olive oil if u feel the pasta is sticking together.Let the pasta cook well for about 10-15 minutes in medium flame. Mix well. Remove from the gas.

Garnish with the fried mushroom and fresh parsley. I dont like chese so i have skipped it, but u may garnish the pasta with some shredded mozarella or parmesan cheese. Mix lightly and serve.
Your amazing and easy Garlicky pasta is ready.


My hubby enjoying his pasta alog with a cup of hot tomato soup.


Serve hot with Tomato soup and french bread slice. Lovely and tasty garlicky pasta. Enjoy!!

Wednesday, April 16, 2008

Ramanavami Speciality - Kosu malli

Shri Rama Chandra ki jai...

Some facts about this day....from the net...:)

Ram Navami is a Hindu holiday. It falls on the ninth day of the Hindu lunar year (or Chaitra Masa Suklapaksha Navami), and is a celebration of the birthday of the Hindu god Rama and on Ramnavmi Shree Bhagwan Swaminarayan was born too in the town of Chhapayia, Uttar Pradesh.

Lord Ram is the seventh incarnation of Lord Vishnu, who takes birth on earth when Adharma over rules Dharma. He protects all his devotees by vanquishing the roots of Adharma. Lord Ram was born on earth to destroy the demon named Ravan.
Hindus normally perform Kalyanotsavam (marriage celebration) with small
murtis of Rama and Sita in their houses, and at the end of the day the deity is taken to a procession on the streets. This day also marks the end of the nine-day utsavam called Chaitra Navaratri (Maharashtra) or Vasanthothsavam (Andhra Pradesh) (festival of Spring), which starts with Gudi Padwa (Maharashtra) or Ugadi (South India). According to recent astrological studies, his year of birth is consider to be January 10, 5114 B.C

Festivals really draw my attention, not due to their mythological importance but due to their....goodies and sweet attractions.So many different sweet varities and prasadams and food varities to eat... hmmm...come one.... who doesnt like festivals now..??


Kosumalli ( or can we call it Raw green gram Salad?)


Sri Rama Chandra ki jai ! Prabhu Sri RamaChadra ki jai ! Sri Ramanavami is here and whats the special favourite for this festival, that I am cooking in my Kitchen?My hubby has lots of sentiments attached to Rama Navami. He remembers and misses his nainamma (granny) for all the variety food she used to make on this day. The way she used to decorate the ram idol for the pooja.And the way she used to enjoy scolding everyone to get ready for the pooja. All those lovely memories of home,india and childhood.He misses all that. Beieng here in US, you dont even get the feel of the festival. So i thought i will make him all the items related to Ram navami and surprise him.


To tell u the truth I had no idea what items are made for Ram navami as we rarely used to make things back in mumbai. It used to just be another holiday for us, enjoy and see TV to the hearts content.Hmmm how much marriage changes someone.... Hmm so i searched the web and found out what kosumalli is...but cudnt get a perfect recipe so created my own.I discovered that i had eaten this thing in so many south indian iyer weddings...but never really knew the name... "kosumalli" , "Koshumburi" ( I still hope this is what it is called...:P)


For kosumalli you need :


Split moong daal : 1 cup
Raw mango - finely chopped : 1/2 cup
Green chilli - Finely chopped : 1 tsp
Fresh coriander leaves - About 1/2 cup
Salt to taste
Freshly grated coconut (frozen is fine too) - 1/2 cup
Lemon juice - 1 tsp (optional)


Method :

Soak the moong daal in luke warm water for around 2-3 hours. Once the moong dal is soaked well... drain all the water and dry the daal on a cloth for around 20 mins, or until all the water is drained and the daal seems dry to touch.


In a big bowl mix all the ingredients along with the moong daal and mix well. Your kosumalli is ready...:) It is so easy and yet so tasty.... Enjoy.. I loved it so much that iam gonna make it often ..os what if its not Ram navami??....:P


Kosu malii freshy made for Rama Navami...Enjoy!

Moon dal Kofta (leftover magic part 3)


Hiii.... says my moong daal wada.... It was missing my blog for nearly 2 weeks now. Remember my previous 2 post where i posted about these lovely moong daal wada and the chaat?

here goes the links...

Moong daal masala wada
http://chutkibharpyar.blogspot.com/2008/04/leftover-magic-moong-daal-1-moong-daal.html

Moong daal dahi wada chaat
http://chutkibharpyar.blogspot.com/2008/04/leftover-magic-moong-daal-2-moong-dahi.html

Well after all the trial and bored with the moong dal wada and chaat... I decided to try something new... and see what I came up with? This tasty moong daal kofta... it turned out so good that I am surely gonna try it again.... leftovers or no leftovers...:P This poor picture was lying in my edit post for nearly 2 weeks (there are several more lying in the edit post for god knows how long.... craving for a write up and to be posted... there chance will come soon....) and I left it there as I felt my blog had got an over dose of moong daal... so now here I am back with the "leftover magic".


My leftover masala moong daal wada


The yummy kofta on its way to perfection and completion


To make this lovely kofta u need :

Moong Daal Wada : 7-8 balls (see previous moong daal masala wada post forthe recipe to make this.)
Yoghurt - 1 cup

Besan (gram flour ) - 2 tbsp

Red chilli powder - 1 tsp

Turmeric powder - 1 1/2 tsp (i love the yellow colour in my curry)

salt to taste

Sugar - 1 tsp

Garam Masala powder - 2 tsp

Oil - 1 tbsp

Bay leaves - 2

Ginger - 1 tsp finely chopped

Fresh coriander leaves for garnishing

Method :

soak the moong daal wadas in warm salted water for 2 minutes, squeeze and keep aside.

In a big bowl, whisk yoghurt and besan together. Heat oil in a pan an add the bay leave to it. Now add the chopped ginger and saute for a minute . Add the garam masala, turmeric powder and red chilli powder and cook in the oil for about 30 seconds on low flame..Add the yoghurt mixture along with salt and sugar. Mix well. If the curry looks too thick, add some water to it to get the consistency of dosa batter. Mix well and allow the curry to boil. Once the curry is boiling add the moong wadas to it. Simmer the curry for 2 more minutes and then remove from flame.Your moong dal kofta curry is ready.

What power this leftover has... it makes a person think so much out of the box....hmmm..So this way the leftover pesarattu batter story ended here, by being transformed into this gorgeous looking kofta curry. Isnt it how life is.... many a times we start with something and end up somewhere else. So true!! enjoy.

Garnish with fresh coriander leaves and serve hot with chapati ot rice.Enjoy!

Mushroom curry puff

Curry puff / Vegetable puff is something you will find in every Iyer bakery or small bakery in India. How I used to love them. Every time I went to Monginis I never used to leave the store without a curry puff or egg puff stuffed in mouth.I was so happy to hear some similar stories from my hubby "R'" after marriage. R is crazy about curry puff and I was so happy to know that he made them once here in US for some potluck party. Hearing this my craving for the puff started and I wanted to try it then and there......He did tell me the method in a brief way...or rather confusing manner.....that I prefered to depend on the internet than on my hubby for the recipe......u know how a bachelor would cook something specially during his school days...here in US...(I am really not trying to accuse all those bachelors who cook sooo well. kudos to u guys..:D.)

I had never used the puff pastry sheets and had no idea how they looked or how I have to work with them......So still confused and craving for the curry puff I kept searching for the perfect recipe... and i stumbled up on this one here...http://sailurecipes.blogspot.com/2008/03/curry-puff.html

Sailu has shown the method of making the curry puff so well that it cleared all my dilemas...:D

I made the masala bhaji on my own with my own ingredients... but u can check the link above for detailed step by step pics...:D

So here goes the recipe :d

You need :

Puff Pastry sheets - 1 pack (u have 2 sheets in these)

Potatoes - 2 diced and boiled

Peas - 1 cup

Mushrooms - 5-6 finely chopped

Red chilli powder - 2 tsp

Garam masala - 2 tsp
Ginger Garlic paste - 2 tsp
Jeera (cumin seeds) - 1tsp

Salt to taste

Oil

Fresh Coriander leaves

Method :

Keep the puff pastry sheet out of the freeze to thaw. Also in the meantine, preheat the oven to 400 degree F .

In the meantime prepare your bhaji for the puff. Take a big pan and pour some oil in it.Heat the oil and add in the cumin seeds and let it splutter. Add the peas to it. Let the peas cook a bit and become soft. I used frozen peas, so it didnt take much time to cook. Now add in the Potatoes and saute well till the potaotes change colour lightly. Now add all the dry masala and mix well. Lastly,add the mushrooms and mix well. Cook the bhaji covered for 5-7 minutes. Now remove the lid and let the vegetables cook on medium heat for about 10 more minutes.Once all the vegetables are cooked remove from gas and keep aside to cool down. Leave the vegetables till they come to room temperature. The filling shoudn't be hot. Wait till it cools down well before stuffing them in the puff.

Now,cut ur puffs pastry sheets in rectangle (As shown in sailu's link above..) or square. If you cut a square, put ur filling in the lower left corner of ur square, brush water to the opposite edges and join the diagonal corners to form a triangle. (I am so sorry I dont have step wise pics of this... will post them when I make my next batch..). I made this way as I wanted small puffs with less filling inside.....U may use the method sailu have given.

Once u have stuffed all ur curry puffs, place them in a cookie sheet or oven proof dishes and bake them. Reduce the heat of the oven to 375degree F and place the puffs in the oven for about 30 - 35 minutes.Once u see that the puff have turned golden brown in colour, off the oven and let it remain inside for 10 mins or so. Now, remove from the oven and serve hot.


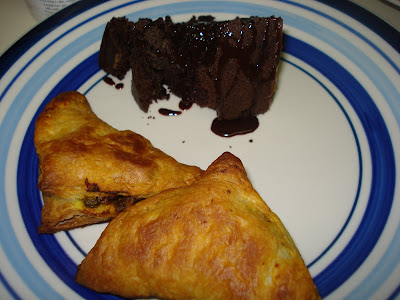
Curry puff and a piece of chocolate cake


What more do u need than Tasty hot curry puff and a piece of chocolate cake? Serve hot with Tomato Sauce. A lovely tea time snack.

Roasted Bhindi Masala / Roasted Spicy Okra

Tasty and crispy Bhindi masala. Bhendi is my hubby's alltime favourite. This is one veggie (other than dondakaya) that he can eat non-stop. Somehow, I am so bored to write this today... the introduction to why I made this bhaji, how I made this and wt are the facts.....hmmmm

Somedays writing seems so boring... the mind goes blank... and u dont understand wt ur writing here... guess today is one of those days.....so Iam going to keep this very very brief.... so here I jump to the recipe...


You need :


Okra - 1 lbs

Besan - 1tbsp

Red chilli powder - 1 tsp

Salt to taste

Cumin powder - 1 tsp

Garam masala - 1tsp

Oil - 1 1/2 tbsp


Method:
Wash the bhindi well and dry them on a cloth... Make sure that ur bhindi is completely dry before u start cooking them. Now, snip both the corners of the bhindi and cut them lenghtwise.
Keep aside.

In a seperate bowl, mix the besan, garam masala, cumin seeds, salt and red chilli powder.keep aside.

Take a big pan and add oil to it and let it heat well. Put the cut okra to the pan and toss well. Let the okra cook for some time until u see brown patches on the okra. Now sprinkle in the dry masala we mixed earlier, into the pa. mix well so that masala coats well on the okra. Cover and cook for 5 minutes. After 5 mins remove the cover and cook til the okra is roasted well.


Your roasted Bhindi masala is ready to be served. Okie this recipe takes a bit more oil. You can reduce the amount of oil and cook too, but it will take a long time.


Serve hot with phulkas or chapatis...:D