WELCOME!


Powered by IP2Location.com
Showing posts with label Soups/Snacks. Show all posts

Friday, November 8, 2013

Simple Tomato soup


This is very easy and simple soup with clean flavors also known as Tomato Shorba. This is my favorite.Pair it with a nice spicy rice or a Sandwich and you have a handsome dinner in hand. Yumm!

Here goes the recipe.

Ingredients :

Tomato - 5 medium (chopped)
Carrot - 1 chopped
Red Onion - 1 small
Garlic - 2 cloves
Ginger - 1/2 piece
Salt to taste
Pepper to taste
Cilantro for garnish

Method :

In a vessel take around 2 cups water and add the whole tomatoes, carrots and let it cook well. In another pan sauté the onions, garlic and ginger well. Peel the tomatoes and put it in a mixer grinder along with the sautéed onions, garlic, ginger and make a fine paste by adding water.

Strain this paste adding a cup of water. Pour it in a vessel and heat again on gas until the soup boils. Add salt, pepper and garnish with cilantro and serve hot.

Enjoy :)

Friday, May 20, 2011

Instant Oats Dosai


Oats Dosai, originally uploaded by gems7882.

After the fried stuff something guilt free and healthy...:D I made this for our evening tiffin yday and DH loved it so much that it ended up being our dinner...:P

I have tried Oats adai earlier but this was my first time making Oats Dosai and I was pleasantly surprised. I saw this recipe in some blog....(i dont remember which one now... will update once I get the blog name) long time ago.... it was very simple recipe and something i thought can be esily altered to our taste. I have tried this recipe only from my memory of wtever I remember.....so suggestions are welcome.

Here goes the recipe

Ingredients :

Rolled oats - 2 cups
buttermilk - 1/2 cup
Onion - 1 small finely chopped (optional)
water - 3/4 cup
Rice - 2 tbsp
Ragi flour - 4tbsp
Green chillies - 2
Cilantro - 1/2 cup chopped
Hing /asafoetida - 1/2 tsp
Black pepper - 1/4 tsp
salt to taste
jeera - 1 tsp

Method :

Soak the oats and rice along with the water and buttermilk and leave for 20 minutes. Please note that the water/buttermilk mix covers the oast completely.

Blend this oats mix in a mixer along with the ragi after 20 mins. Blend it into a fine batter.

Now add chopped green chillies, cilantro, jeera, hing, salt, onions(optional) and mix well.

Heat a tava/ griddle and make pancakes / dosai. Serve it hot with chutney. I did with lime pickle..Yumm!


Basil Corn Pakodi


Basil corn pakodi, originally uploaded by gems7882.


Rain pouring outside ur window.... you sitting near the big window and enjoying the rains with a cup of coffee some hot pakodis and with sweetheart. what else do u need? hmmm. I enjoying spending such romantic evening with my DH. I remeber how we used to enjoy evening like this when we were newly married. Somehow as time passes we start skipping and then missing these little moments of together.

The weather in LA has become weird these days. It is sunny n hot one day and the next days its complete opposite - cold and chilly... brrr.... I wish I get back the pleasant and sunny LA weather..:(. But until then we r enjoying this weather too...:) with hot hot pakodis..:P

This pakodi actually started with sweet corn vada recipe which my Mom-in-law had shared with me. I wanted to try it as I had some fresh corn on cob. But as I was making this batter for the vada I came across some fresh basil in the fridge which was almost on its death bed.. hmmm so in an attempt to use it I decided to make a pakodi instead of vada and add basil to it. The pakoda turned out so good.... tasty. My DH simply loved it...its a keeper in my recipe book... Yumm!

here goes the recipe.

Ingredients:

Fresh corn on Cob - 2
Green chilli - 2
Ginger - 1 inch piece
Cilantro - 1/2 cup chopped
Frozen corn kernel - 1/4 cup (optional but preffered)
Onion - 1/2 cup chopped
Fresh basil - 1/2 cup chopped
rice flour - 1/4 cup
Cumin seeds - 1/3 tsp
saunf (fennel seeds) - 1/4 tsp (optional)
salt to taste

Method :

Cut the fresh corn kernels off the cob. You can check how to do it here. Tip - Well instead of a bundt pan u can use a big bowl and place a very small inverted bowl inside it..:) thats how I did it.

In a blender add the fresh corn and all the other ingredients except the frozen corn kernels and onions.The batter should be thick. Dont add more than a tbsp of water (only if needed). If u mixture becomes too liquidy u can add some cornflour or rice flour.

Now to the blended mixture add the frozen corn kernels and onion and mix well.

Heat oil on a medium heat. Put small nuggets of the batter. Fry till they r crisp and golden in colour. Your tasty basil corn Pakodi is ready ! Enjoy with a dash of tomato ketchup...:)


Tuesday, February 22, 2011

Chana Jor Garam


"Chana Jor garam..... Chana Jor garam babu main laya mazedaar Chana Jor garam..." Thats the song from the movie kranti... I know its not such a famous song but I remember it because its about my favourite munchy snack "Chana Jor Garam". If u have not seen the movie Kranti I would reccomend u to see it..not for the snack...:P. It is a good Desh bhakti movie with veteran actors and good acting..:)

Here is the song from Kranti for all to enjoy. The funny thing is I found another old song by Shamshad Begum and Kishore kumar...:) It was somewhat same lyrics as the newer one..:P Here is the old song.

In the newer song u can see Shatrughan Sinha and Hema Malini carrying small box kinda thing around there neck.... well thats how the chana vendors in Nagpur used to get it for selling Chana Jor Garam. He will call out loudly " Chana Jor Garam" in a very distinct tone. Ohh how I used to wait for him.... I don't remember if I ever even waited for "R" that way.... hehehe :P. Hope he is not seeing this..:P. My oly memory of having this was when I was in Nagpur. It seems, this street side snack is famous in Mumbai too but sadly I never went past the Bhelpuri n pani poori all the time I was in Mumbai :(

The street version of the chana Jor is deep fried and is very difficult to make.The chana has to be soaked, then dried, then fried and then later flattened into these mini discs. I went for the healthier and easier option "Haldiram's Chana Jor". It is ready made hence easy and baked hence healthy..:)

If any of u ever tried making this chana Jor at home do let me know how u managed doing it. Maybe seeing you I can give it a try. Anyways Once the Haldiram's packet it opened... this recipe is a child'd play.

Ingredients :

(recipe serves 4 or 2 very hungry people like us :d)

Haldiram's Chana Jor Garam - 1 packet
Onion - 1 small chopped

Tomato - 1 chopped

Juice of lemon - 2 tsp

Salt to taste (I used rock salt)

Red chilli powder - 1/2 tsp

Cilantro - 2 tbsp (finely chopped)

Raw Mango - 1/3 cup chopped (optional)

Method :

1) Take the chana chor in a microwave safe plate and MW for 45 seconds. I like the chanas to be a bit warm...:) This process is completely optional and doesnt make any difference to the taste of the chana. In a big mixing bowl combine all the ingredients (except salt n chili powder) and mix with a gently hand.

2) Taste the mixture for seasoning and add the salt and chilli powder accordingly.

3) The Haldiram chana chor has added salt in it... so its advisable to taste it before adding any salt. Serve in a Paper cone as I did....and relive the taste and streets of Mumbai / Nagpur :D

Wednesday, February 16, 2011

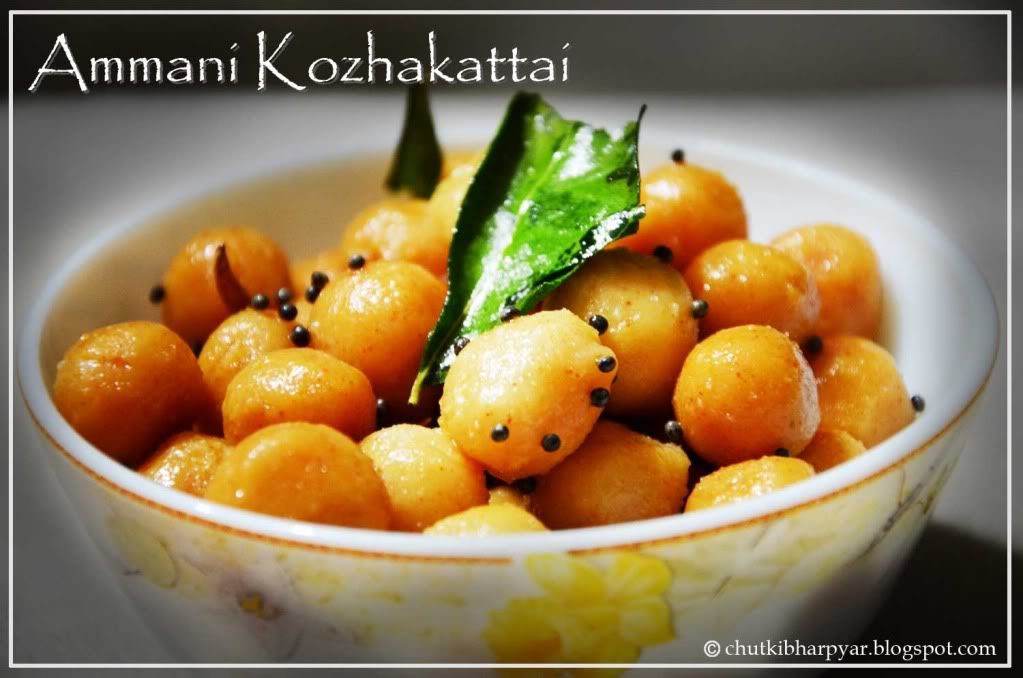
Ammani Kozhakattai


This is one of my favorite evening snack. I used to love this as a kid. Every Pillayar Chaturthi I used to wait for the poojas to get over so that I can enjoy these amazing Kozhakattais....:)

So here come the recipe for the heavenly kozhakattais..:)

Ingredients :

Rice flour - 1 cup

Red chilli powder - 3 tsp

Hing - 1/4 tsp

Salt to taste

Oil - 1 tbsp + 1 tsp

Warm water - 1/2 cup

Mustard seeds - 1 tsp

Curry leaves - few

Red chilli - 3

Method :

In a bowl mix all the ingredients together into a soft pliable dough. make small marble size balls of the dough. Steam the balls in a pressure cooker.

In another small pan take some oil and heat it well. Add the mustard seeds, curry leaves and the red chiili. Let it brown a bit and then add it to the steamed kozhakattai.

Enjoy this easy to make simple snack...:)

Saturday, February 5, 2011

Roasted Batata Vada

Photobucket

Yes.... I am thinking fried n oily food today. First I posted an Onion Pakoda recipe and then a batata Vada post..... but thank god this one is not deep fried... compared to its original version..:d This is a roasted Vada paav. I want to thank my friend Pooja from college to pass this idea to me of making a guilt free batata vada...:P Thank u Pooja :) I owe u one :D

I made these vadas for our evening snack yday. When I first told "R" I am making Batata vada his first reaction was "nooooo" ...hehhe yeah. We both r having cold and the idea of heating oil, the smoke and the greasy batata vada is the last thing we want now..:P Inspite of the great love we have for the vada we just can't bear the heated oil smoke in our home. When I told him I am roasting it...He was excited to try it :). really the vadas turned out so good....I didnt miss the oil at all...:) It was yum yum !

Ingredients:

Potatoes : 4 big russets (boiled and lightly mashed)
Garlic - 8 pods (the more u have the tastier it tastes)
Ginger - 1" piece finely chopped
Curry leaves - 10 to 12 leaves
Green chilli - 2 finely chopped
Coriander leaves - 1/2 cup finely chopped
Oil - 2 tsp + 1 tbsp
Mustard seeds - 1 tsp
Jeera (cumin) - 1/3 tsp
Besan - 1/2 cup
Red chilli powder - 1 tsp
Salt to taste
Turmeric powder - 1 tsp + 1 tsp
A paniyaram pan.

Method :

1) In a saute pan add 2 tsp of oil. To it add the chopped garlic, ginger and green chilli. After its sauted a bit... add the curry leaves and turmeric powder.
2) Add the mashed potato and salt and mix well. Heat it the spices mix well with the potato. Add the fresh chopped coriander and mix well. Ur potato filling is ready. 3) Make small marble size balls of the mixture and keep aside.

4) In another bowl, mix in the besan, salt, red chilli powder and turmeric powder with some water. Mix well into a nice batter somewhat like a dosa batter consistency.
5) Heat the paniyaram pan (preferably a nonstick...as it takes less oil..) and put a drop of oil in each of the pans. Dip the balls in the batter and fry them. Turn it after it cooks on one side. Cook both the sides. Remove from the pan and eat it with some garlic chutney or Tomato ketchup.

U can also stuff this vada into a bun or paav and enjoy delicious vada paav :)

Onion Pakoda

Photobucket

Rainy, cold evening, steaming cup of coffee.... someone to talk sweet nothings and crispy hot onion pakodas... hmmm wtelse can u ask for?

Last month Los angeles witnessed some very bad rain.....now dont give me stares...but it was really bad compared to what we get normally. I have never seen so much rain in the past 4 years that I have been here. First 2 days were like "wow its raining".

Next few days were like "again....? good we need water to remove the scarcity" .

After those early few days....it was like " what the hell its raining again....I hate it :P"

Now I know that an overdose of anything can make u hate it :P


Anyways whats best than hot crispy pakodas for a rainy evening..:)


Ingredients :

Onion - 2 (Any type will do...I used red)

Besan (gram flour) - 1 3/4 cup

Rice flour - 1 tbsp

Salt to taste

Red chilli powder - 2 tsp

Green chilli - 1 finely chopped (optional)

Fresh coriander - few sprigs (for additional flavour...but is completely optional)

Oil for deep frying

Method :

1) Heat the oil in a kadai on medium heat and then clean and chop the onions into thin slices...such that u can seperate each layer. Add salt, red chilli powder and keep aside covered for 10 to 15 minutes. 2) The onions will leave water.

3) Add the gram flour and rice flour to the onions and mix well. 4)Mix the besan and rice flour together. Add the flour little by little to the onions.... U may sometimes not even need the whole 1 3/4 cup of flour depending on the amount of water the onions leave. Add green chillies, coriander leaves and mix well. The batter shouldn't be running. 5) It should be thick and sticky. Dont add water to this. If u feel u added more flour, just let the batter sit for 10 minutes or more and then mix it well... it should become fine.

6) Now check if the oil is hot. The oil should be moderately hot so that the pakodas rise as soon as u put them in oil. 7) Fry the pakodas until golden and remove on a kitchen towel (paper napkin ) to drain the excess oil.

Serve with hot filter coffee on a rainy evening... or even otherwise..:) enjoy!

Sunday, August 16, 2009

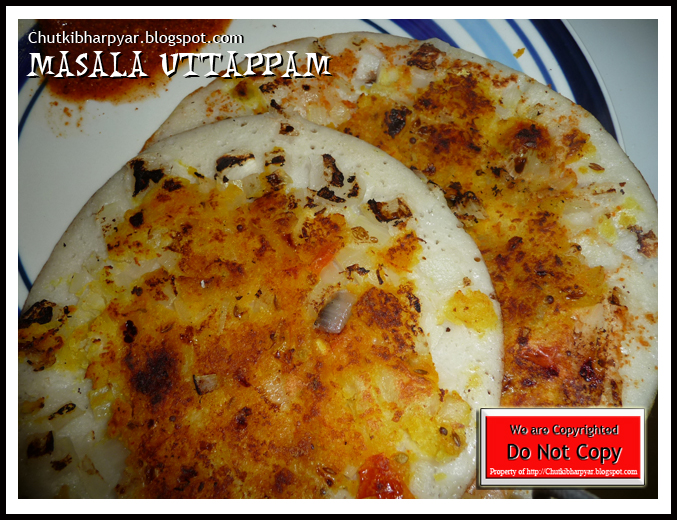
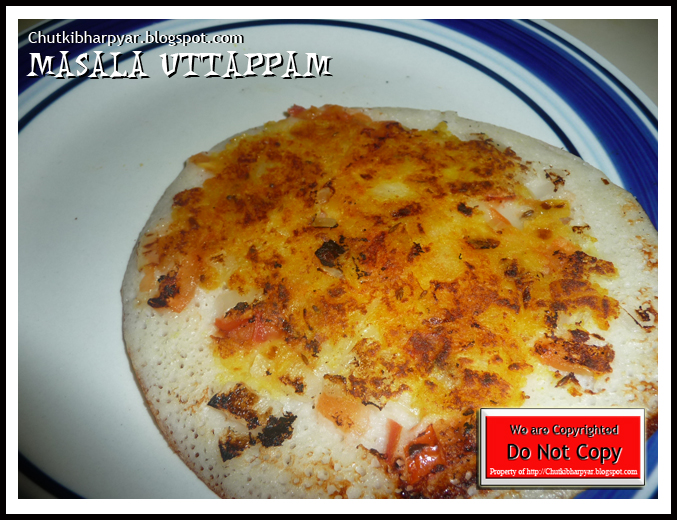
Masala Utthappam


You all must have eaten masala dosa...but have u ever tired masala uttappam? I ate this first time in a restaurant near my place back in Thane. It was so tasty and yummy. So anytime u have the masala filling and dosa batter why not try this than the conventional Masala dosa..:)


Ingredients :

Dosa batter
Oil for cooking
Onion - 1 finely chopped
Chaat Masala - 2 tsp


For Spicy masala

Potaoes - 5 boiled and mashed
tomato - 1 chopped
Green chillies - 3 finely chopped
Ginger - 2 tsp
Garlic - 1 tsp (optional)
Fresh corinader leaves
Mustard seeds
oil
Salt to taste
Kitchen king masala - 1tsp (optional)

Method :

Firstly we will make the masala. Now this masal is similar to the masala dosa masala preparation. U can even use the leftover masala from masala dosa to make this. Anyways, In a kadhai take some oil and put in the mustard seeds. Let it splutter and add the green chillies, garlic and ginger. Go ahead and put in the chopped tomatoes along with all the powders. Mix well. Cook till the tomato is tender and the masala is cooked. Add in the boiled mashed potatoes and add to it a cup of water. Mix well and let it cool well. Garnish with fresh coriander leaves. Now ur spicy masala is ready.

Assembling the Masala utthappam. Pour a big laddle full of batter on the pan and spread it to make a nice thick dosa. Sprinkle the chaat masala and chopped onions. Let it cook for 1 minute and scoop in a spoonful masala on the utthappam and flatten it. Pour oil on the sides on the dosa. Let one side cook completely well and then flip it over to cook the other side. Pour oil to the other sides too and cook well. Ur masala Utthappam is ready now to relish.

Enjoy ! Have fun.


Wednesday, August 12, 2009

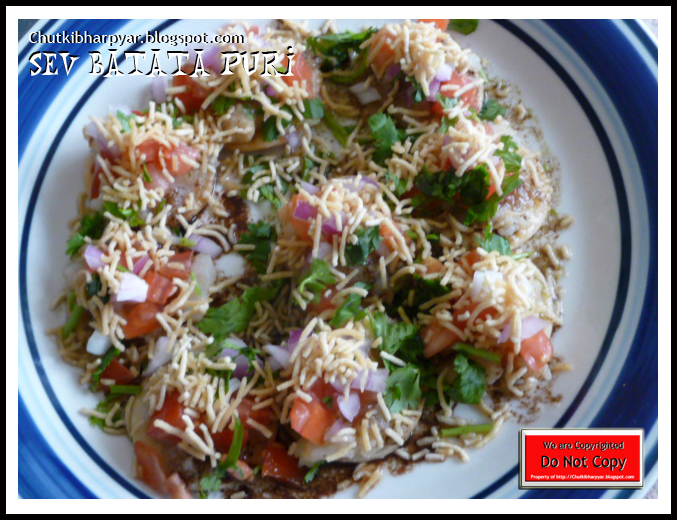
Sev Batata Puri


I am from Mumbai the chaat paradise of India. I love chaat items and I am lucky that my hubby enjoys it too....actually he is good at making these chaat items too. Will surely share few of his chaat Speciality with u guys later. So As we both like Chaat we often make it and sometime its our dinner...:) Unlimited chaat hehehe :P.

Sev batata poori is something i dont make that often mainly coz i dont get those flat pooris here that easily. And If I spot them in any shop... I stock my pantry with atleast 3 packs of these pooris hehehe :P. Sev is the thin noodles kind of snack made with gram flour. U can easily get it in any India store. Batata means Potato in Mumbai local language and Poori are normally small puffed hard shells but in this case....they r flat discs like canapes.

Anyways here goes the Sev batata poori recipe.

Ingredients :


Sev batata puris (flat ones) - 1 pack

Potato boiled and mashed -2

Garbanzo beans cooked and lightly mashed - 1/3 cup (optional)

Tomato finely diced - 1 cup

Red Onions finely chopped - 1 cup

Chaat masala - 2 tbsp

Salt to taste

Spicy Green chutney - 1/2 cup (optional) / u can even use red chilly powder :)

Sweet tamarind Chutney - 1/2 cup

Fine Sev - 1 1/2 cup

Fresh coriander leaves - 1 cup finely chopped

Method :

For Spicy green Chutney - Grind coriander leaves, green chillies and mint leaves together. Dont put too much water. Adjust the chillies according to ur spice intake. Ur green chutney is ready.

For Sweet tamarind chutney. Take tamarind water or tamarind concentrate mixed in water and boil it. Add jaggery and boil for 20 minutes.. once the chutney becomes a bit thick ur tamarind chutney is ready.

For the potato filling - Mash the boiled potatoes and the garbanzo beans together. Add salt, red chilli powder and little chat masala and mix well. Keep aside.

Making sev puri. In a serving plate arrange the pooris. Put a spoonful of the potato filling on the puri. Top the masala with a tsp of green chutney and a tsp of sweet chutney. Sprinkle onions, tomato, fresh sev and some chat masala on each poori. Garnish with chopped coriander leaves and Serve.

Ur simple and easy Chat is ready...:)

Tuesday, August 11, 2009

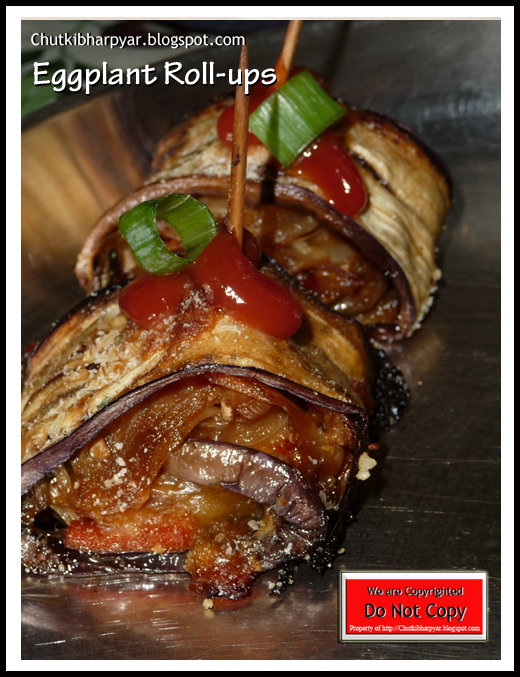
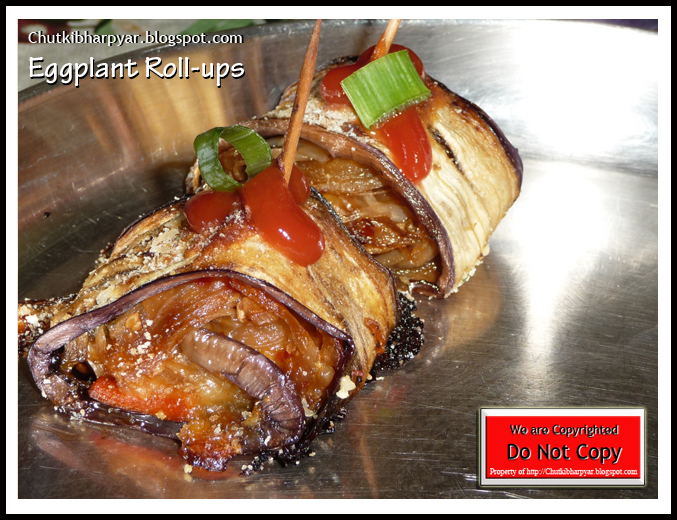
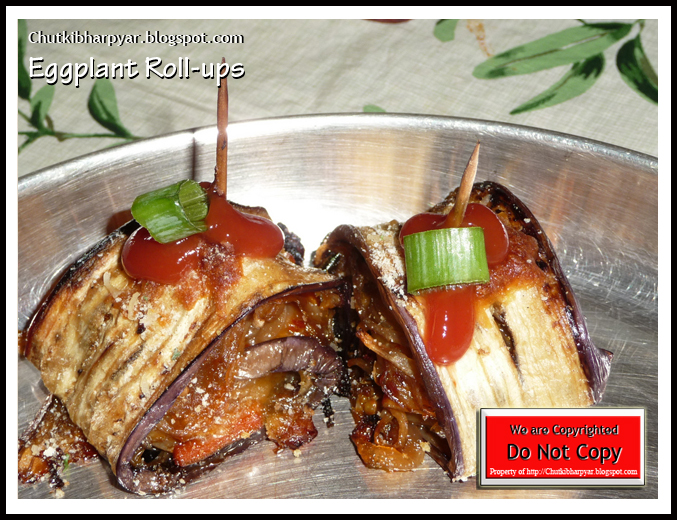
Eggplant Roll-ups


This is one amazing Appeatiser that I have made till date. Its so simple to make and so tasty.
I wanted to make something simple and light for my dad. He is visiting us from india. I am so excited about his visit and I want him to enjoy this stay...:) I just started this and went of building this recipe according to my taste and it turned out so nice...:) I am glad I tried to experiment..:)

Anyways getting back to my eggplant...here is the recipe for the same. I have made a chinese style filling u can alter the filling according to ur taste.

Ingredients:

Italian / Chinese eggplants - 3
Low fat Cheddar Cheese - 1 cup
Pam spray

For the stuffing:

Onion / Green onions finely chopped - 1/2 cup
Bean sprouts chopped - 1/2 cup
Carrot julliened - 1/2 cup
Green Bell Pepper finely chopped - 1/2 cup (optional)*
Soya sauce - 1 1/2 tbsp
Red Chili garlic paste - 3 tbsp (reduce it if its too spicy)
Ginger - 2 tsp
Tomato Ketchup - 2 tbsp
Sugar -1/2 tsp
Salt to taste
Red chilli flakes (optional)*
Sesame oil - 1tsp


Method :
Clean and make thin slices of the eggplant lenghtwise. U will get long strips of the eggplant. Rub light salt on both the sides of the eggplant slices. Heat a Tava / Pan and roast the eggplant slices. Roast to an extend that the slices r slightly soft and cooked. This step is important to make the slices tender and easy to roll. Spray pam on it if u desire. Keep them aside.
Preheat the oven to 375 Degree F.Prepare the filling.
In a Deep bottom pan heat oil. Add the ginger, chili garlic paste and suate for a min. Add the onions and saute well. Add the sugar and mix well so that the onions r slightly caramalised. Now add soya sauce and the tomato ketchup and mix well till the sauce is nice and hot. Add all the vegetables one by one and mix well. Cover and cook for some time till the veggies are tender. Add salt and chilli flakes according to taste. Once the filling is ready keep aside.
Arrange the eggplant slices one by one of a working surface. Add layer of cheese on the effplant. Spread a spoonful of filling on the Slices evenly, Leaving an inch of the slice on one side. Roll the slices into a swirl roll and put a toothpick to make the rolls stand. Make rolls out of all the slices. Spray pam on a cookie sheet and arrange all the rolls on it. Top each roll lightly with cheese and bake for 10-15 minutes in a preheated oven. Serve hot with Tomato Ketchup.


Serve Hot. Enjoy and Relish with tomato ketchup....:)

Wednesday, July 22, 2009

Tofu Tikka Masala


It was a lousy spring evening and I was feeling so lazy. I didnt even wanna get up from the couch to open the door. Hmm somedays I do get this attck of laziness but then as we have to eat and cook I have to push myself to go to the itchen and start working...phew!.

That particular day hubby was graceful enough to offer to make some snacks for us...:DAnd he came up with this. I personally dont like frying much, but when ur getting things done for u without doing anything... the best thing is to keep quiet and enjoy hehehhe:P I am a devil na? hehehe

Anyways going to this recipe, it turned out so nice and tasty, a very good Appeatiser.

Ingredients :

Firm Tofu - 1 pack
Corn flour - 1 tbsp
All purpose four - 2 tbsp
Red chilli powder - 2tsp
Salt to taste
Pepper - 1 tsp
Kitchen king Masala - 1 tsp (optional)
Oil for frying

For Garnish:
Chaat powder
Onion slices


Method :

Open up a Tofu packet and drain out the water. Squeeze the water out of the Tofu. Wipe it with a kitchen towel to remove any excess water. Cut the Tofu in cubes and keep aside.

In a big bowl add the AP flour, corn flour, Red chilli powder, salt, pepper and kitchen king masala. U can Also add a tinge of soya sauce to it if u desire. Add very little water and make into a smooth paste. see that its not tooo watery.

Add the tofu cubes to this mix and coat all the tofu cubes with the batter. Leave aside for 5- 10 minutes.

Heat oil in a kadhai. Add the tofus to the oil and deep fry. See that the tofu doesnt stick to each other while frying. Once golden brown in colour, remove from out and drain out on kitchen towel so that all the excess oil is removed.

Now for serving. You can serve this anyway u want. I put these on a toothpick along with a piece of onion and sprinkled some chaat powder on it. Serve it hot along with some Tomato Ketchup.

U can even make chili tofu out of these or even tofu manchurian. We made chilli tofu with the leftover tofu but forgot to take any snaps :P hehhee. Enjoy this dish and have fun!

Yummy Tofu Tikka masala :D enjoy!

Tuesday, July 21, 2009

Jalapeno Pretzels - Baked


Who doesnt love pretzels and specially if its an Jalapeno Pretzels.... hehhe I can see all the spicy food eaters shaking their heads along with me. I was first introduced to this pizza with handle at Wetzel's Pretzel here in Los angeles. I normally cant eat jalapenos much, but when it comes to this I can keep hogging with tears running down my cheeks yet wont stop :P...hehhee. I instantly fell in love with it. From then, whenever I go for shopping I make a point to grab one of these. Its so filling and tastes so good.

I found out recently that not just Wetzel's Pretzels but almost all the pretzel centres in USA have these Jalapeno pretzels. I recently had one in Aunt Annie's. It was not as good as Wetzel's but yeah, it was Jalapenos okie :P

Did u know that soft baked pretzels r very very famous in Pennsylvania. U can find it in almost all stores and mall there? Well I didnt know but I remember seeing that in some show. Anyways now u wants to know about the origin right? Lets talk about this recipe... I combined the procedure and ingredients from 2-3 sites to get my own pretzel recipe. I got a bit confused with the yeast quantity..( I didnt see the amount of water I have to use to mix the yeast....hmmm :( and ended up with a watery dough... and then again ended up adding more flour and yeast hehhe) hence I didnt get the perfect knot on the pretzel and it looks all merged up :P

Well did u know that the calorie content in an Aunt Annie's pretzel is 310 and its very high in sodium? Thats coz they r normally fried. Hmmm yeah seeing that I felt y not trying making our favourite at home, thats way I know what I am putting into it... good or bad ;) So here is my recipe. I have used All purpose flour for this recipe... But u can make it even with wheat flour for making it more healthy...:D


Wooo can u see the baked Jalapenos on that one.... I am sure that will make u drool over this one :) Isnt it??

I somehow dont like plain pretzels. I need the cheese and the butter grease on it for me to appreciate its genuine quality... hehehhe:P Anyways here goes my recipe. I took some tips from Divya's Dil-se blog too. Thanks Divya.

Ingredients :

Active dry Yeast - 2 1/4 tsp
All pupose flour - 3 cups
(If using Wheat flour - 4 cups )
Sugar - 1 tsp +1 tsp = 2 tsp
Luke warm water (for yeast) - 1/2 cup
Salt - 1 tsp
Olive oil - 1 tbsp
Baking Soda - 1 tsp

Options for caramalising the pretzel..

Milk - 1/2 cup
or
Baking soda - 2 1/3 tsp &
Hot water - 1 1/2 cup
0r
Eggyolk - 1
and 1 tbsp of water
Or
Maybe some sugar solution (check the video to understand about these toppings :D)

Other toppings:

Butter - 1 tbsp
Cheddar cheese - 1 cup
Jalapeno thinly sliced - 1/2 cup
Garlic powder (optionla)
Kosher salt


Method :

In a measuring cup take 1/2 cup like warm water and add 1 tsp sugar and yeast to it and mix well. Keep aside till the yeast froths well.

In another bowl add all the dry ingredients like the flour, salt, sugar and mix well. Slowly add the yeast mixture and knead the dough for 8-9 minutes. The dough will be elastic which is okie...:) Mix well until smooth :). Add a tsp of olive oil on the dough and mix well so that the oil coats the dough well and that the dough doesnt stick to the bowl. U can even use a fresh greased bowl instead...Cover with a cling wrap and keep aside for 1 hour or so.

Preheat the oven at 450 degree F.

After 1 hour u can see that ur dough has doubled in size. Now make small tennis ball size rounds and keep aside. It will make around 11 balls. Take each ball and roll it into a long medium thickness thread and twist to form the famous pretzel shape. You can either form a knot or else u can place the ends across on each side...:) You can refer to this site for tricks for this step. You can check this video to know more about shaping the pretzels and making the colour nice and golden brown :D

Now that ur pretzels r shaped now comes the turn for the topping. Before we start with the topping we have to think how we r going to make out topping stay on oyr pretzels and also how to get that caramalised brown colour on our pretzels.

Commercially they use a product called lye which is very corrusive and as we r trying to making something healthy (before than store bought stuff) we dont wanna handle anything that damages our tissues right? So what else can we use. I have given different options in the ingredients and also the video that I shared tells u in detail what all can u use. For this recipe I have used Baking soda alone. we can combine it wil Egg yolks to make it more golden. I skipped it...:)

In a bowl take nice hot boiling water. Add baking soda to it and mix well with a spoon. Add the shaped pretzel in the water and leave it for like 30-40 seconds. Leaving it for this much time is important orelse ur pretzels wont get that golden colour...:) Take it out and place it on a lined cookie tray. Use lined tray to make it low cal... greasing is no way better right?

Now garnish ur pretzels with some kosher salt, sliced jalapenos and top it with some cheddar cheese as garnish. U can add garlic powder if u wish. Now ur pretzels r ready to be baked. Put them in the oven for 8-10 minutes. Once the pretzels become golden on top u can take them out and serve hot...:)

Hope u enjoy these pretzels.

I have tried to share as much information possible so that u can enjoy these lovely pizza with handles at home...:) Do leave ur comments and suggestions :D
Enjoy!

Monday, July 13, 2009

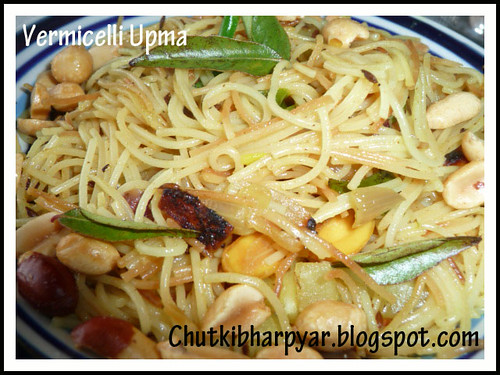
Vermicelli Pasta or Semiya Upma


Vermicelli originates from Italy and means "Little worms" by literal meaning...:) It is a type of pasta...just like spaghetti but is much thinner than Spaghetti. This type of pasta was introduced in italian cooking in the 14th - Century.Thats the history of Vermicelli.

Its a long journey from Italy to India. In India vermicelli is known as Semiya or Sevaiya. Onother big difference in thos vermicelli pasta and the semiya that we get in india is the flour it is made of. Vermicelli pasta is made of durum wheat whereas Semiya is made of semolina.

Anyways the other day I get to our local grocery shop and got this weird looking string kinda thing...which did look like semiya but was in a coil shaped compared to the normal broken form of the semiya we get back in india. But anyways I bought it, and ended up making this pasta upma.....for this u need....


Ingredients:

Vermicelli Pasta - 1 pack

Onions - 1 finely chopped

Green chillies - 3 slit lenghtwise

Curry leaves - 2 twigs

Jeera - 1 tsp

Peanuts - 1 cup

Salt to taste

Oil

Ghee - 1 tsp

Lemon juice

Coriander leaves for Garnish


Method:

Cook the vermicelli pasta as directed in the package. drain and keep aside.

In a kadhai or a thick bottomed vessel add the oil and heat it. Now add the Jeera seeds and allow it to splutter. Add the green chillies, curry leaves and onions and saute well. Once the onions r transparent, add the peanuts and sauter for 5 mins.

Finally add the cooked vermicelli and mix well. Add salt and toss it once more.Remove from flame and garnish with coriander leaves and lemon juice. Top it with a spoon of ghee for the ultimate taste. mix and serve hot :) If u wish u can skip the ghee too..:)

It makes a great brunch meal or evening tiffin...:) Its our lunch time favourite...:D


Enjoy!!

Sunday, March 29, 2009

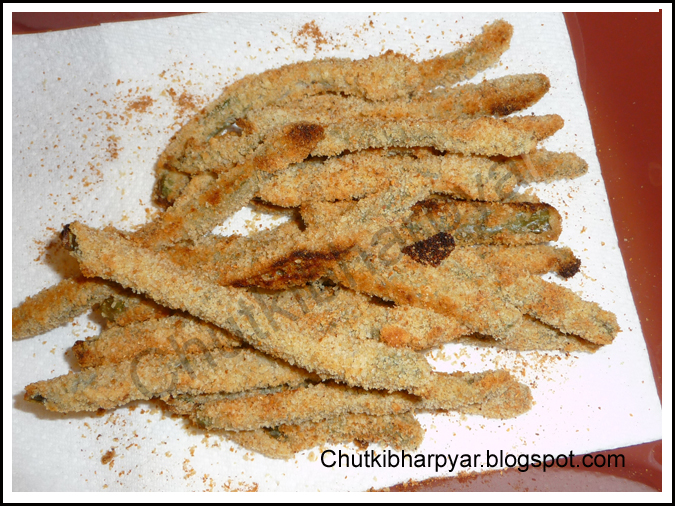
Baked Bean Crisps


I had deep fried French beans crisps at P.F Chang restaurant a few months back. I really liked it so much that I wanted to try it at home. Just made some modifications. I baked these crisps instead of deep frying them. It makes a great evening snacks...:) Hope u enjoy eating this as much we did. What great way to eat the healthy beans? the healthy way ofcourse...:) and this is it.....:P

Ingredients:

French beans - 1/2 pound

Thick Yoghurt - 1 1/4 cups

Sour cream - 1/3 cup (optional)

Salt to taste

Cheddar cheese - 1/2 cup (optional)

Pepper - 1 tsp (add to taste)

Lemon extract - 2 tsp

Cayenne pepper / Red chilli powder - 1/2 tsp

Dried Oregano - 2 tsp

Bread crumbs - 4 cups

Oil spray

Method:

Preheat the oven to 375 degrees F.

Clean and cut the ends of the french beans. Steam the beans in a cooker or in the microwave till tender and well cooked. Keep aside to cool.

In a big mixing bowl add the Yoghurt and beat it well, until smooth and creamy. Mix in the sourcream. This just adds the tartness to the batter. You can skip it too and instead add some extra lemon extract..but caution! this will make the batter very watery....:)

Now add the grated cheddar cheese and mix well. Add all the other spices (except bred crumbs ) and mix it well until smooth and thick. (this mixture tastes great as a dip too...:P yummmmm!)

In a plate spread the bread crumbs.

Coat the steamed beans with the yoghurt mix and then roll in the bread crumbs. Place them in a cookie tray (baking tray) one by one. Spray the oil spray over the beans and bake them in the preheated oven for 20 to 25 mins or until the beans becomes lightly brown on top..

Your Bean Crisps are ready to be served...:) Serve hot with tomato ketchup.

Saturday, March 28, 2009

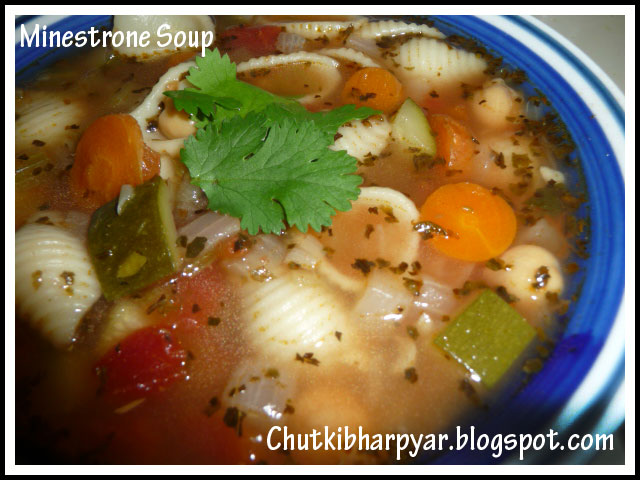
Minestrone Soup


This is a very very easy soup and whenever I remember this soup, I remember Olive Garden. Yeah I am sure many of ur feel the same. I think we get the best minestrone soup in Olive garden...atleast from the places I have tried...:)

I was just sitting on the couch and thinking of what to make for dinner. Something light and nice and easy to digest. What better than this simple and flavourful soup, which can be made with veggies and spices that r easily available at home. This simple dinner along with bread toast was ready in just 30 minutes...:). Yumicilious.....:) So here goes the recipe. Hope u enjoy this simple soup...:)


Ingredients :

Carrots - 1/2 sliced

Onions - 1 finely chopped

Celery - 1 cup finely chopped

Diced Tomato - 1 can medium size (u can use 4-5 fresh or combine both can and fresh ones for more flavour)

Peas - 1/4 cup (optional)

Shell pasta /Elbow pasta - 1/2 cup (uncooked)

Zucchini - 1 sliced

Garlic pods - 7 finely chopped

Vegetable stock / Water - 5 cups

Garbanzo beans - 1 cup

Oregano - 4 tsp (fresh or dried)

Basil - 2 tbsp (fresh or dried)

Pepper - 2-3 tsp

salt to taste

Olive oil

Italian parsley for garnish


Method :

In a big pan add some oil and heat it well. When hot enough add the garlic and saute for few minutes. Now add the onions and saute well till the onions are transparent.

Now add the stock / water and bring to a boil. Add all the chopped vegetables and mix well. Add the spices, salt ( be careful while adding salt if ur using vegetable stock, as the stock may contain some salt in it as preservatives) and let it boil for like 10 minutes, until the veggies cook a bit. Now add the garbanzo beans and cook covered on medium flame for 25 minutes.

Now after 25 minutes stir the soup well. If u think the soup looks too thick or too chunky add some water to it. Let it boil a bit and then go ahead and mix in the pasta. Stir well and cook it covered for another 10 to 12 mins. By now u can smell the minestrone soup. I felt as if I was in Olive garden...:) Well once the pasta is cooked u soup is ready for serving...:)


Garnish with some fresh parsley leaves and serve hot with some ciabata or fresh bread...:) It makes an awesome dinner...:D specially in winters...:) Have fun

For variation: You can add more vegetables in this soup, like potatoes or corn kernels..:)

Enjoy making this awesome soup...:)

Tuesday, March 10, 2009

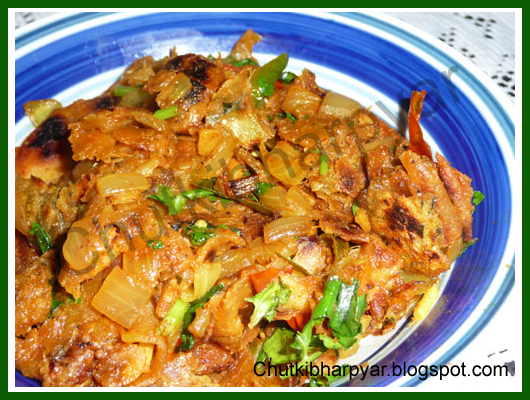
Kothu Barota / Parotha

Kottu Barota / Parotha comes from Tamil Nadu, guess from a city called Trichy or Tiruchirapalli. Some say it has originated from Kanyakumari district of Tamil Nadu. I dunno much about its history and origin except that whoever invented this dish was a genuis. The literal translation of "kottu parotha" is Minced Paratha (indian flatbread) and that is how it is made, by shredding the parathas and adding it to some stir fried veggies...yummm! And for other who r wondering what is "Barota or Parotha..." thats how u call parathas down in chennai... heheh:P

I am a vegetarian hence showing the vegetarian version, but normally its made using egg and is called "Mutta kotthu paratha ". Muttai means egg in "Tamil". U can also add shredded chicken to this dish I guess. Just keep experimenting.

Anyways its very very easy and simple to make and I am sure you will love this one. My hubby had never eaten this before and when he did he simply fell in love with this.

I used to have something similar when I was in school. My friend used to get this in dabba....Her mom used to make it with leftover phulkas(rotis) dont remember what she used to call it in marathi...hmmm old days r so good isn't it?

Anyways here goes the recipe and the list of ingredients.


Ingredients:

Store bought frozen parathas : 3 (I used malabar paratha)

Onion : 1 finely chopped

Tomato : 2 medium finely chopped

Green chillies : 2 slit lenghtwise

Ginger : 1 inch minced

Cumin seeds (Jeera) : 1 tsp

Salt to taste

Dhania-Jeera powder : 1 tsp

Garam Masala powder : 1 tsp

Red chilli powder (optional)

Oil : 2 tsp

Fresh coriander leaves : 1 whole bunch finely chopped

Method :

Thaw the parathas slightly and roast them on the tava accroding to the paskage instruction. Shred them into small pieces with ur hand or using a knife and keep it aside.

In a kadhai take some oil and add the Jeera. Let it crackle. Now add the chopped ginger and mix well. Toss in the onions and saute till transparent and follow with the chopped tomatoes and cook till nice and tender. Add the garam masala, red chilli powder and dhania - jeera powder.Let hte masalas cook well. Once the water evaporates from the tomato onion mix, add the salt and toss in the shreded parathas and mix well on medium high heat. turn off the gas and leave it for 2 minutes. Now garnish with coriander leaves and lemon juice. Mix well and serve hot.:)

I am sure u all will enjoy this. My hubby topped it with some fresh chopped onions and some sev. It tasted delicious...:)

Hope u enjoy this traditional south indian delicacy as much we did.... Yumm is the word for this one !

Monday, March 9, 2009

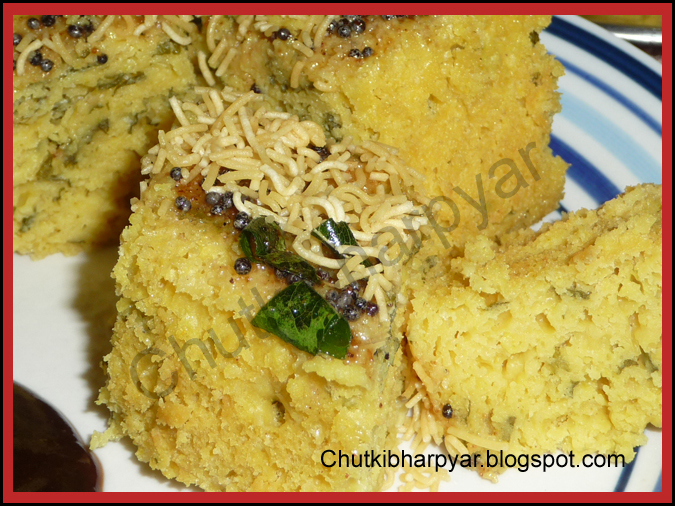
Khaman Dhokla


So soft and so spongy. Isnt it? I remember my dad used to get them for us.. almost all weekend...from the famous haldiram's when we were in nagpur... that is when I started liking this comfort snack. They used to serve this with fried and salted green chillies.... yumm believe me my mouth is watering now..:P I am drooling hehehe:P

Anyways there also another way of serving this delicious dhokla. I had this at a friends place when I was doing my degree. You need to crumple the dhoklas (once cold ) with ur hands . Be gently when ur doing this. Dont mash the dhokla..:) put the crumples on ur serving plate. Drizzle tamarind chutney and garnish with sev and coriander leaves. Nice isnt it? Adding onions will add to the taste here...:P

Anyways.. going back to the recipe..


Ingredients:

Gram flour (Besan) : 1 cup

Yoghurt : 1 cup

Semolina : 2 tbsp

Warm water : 1/4 cup

Green chillies : 1 finely chopped

Fresh corinader leaves : 3 tbsp

Salt to taste

Turmeric powder : 1 tsp

Lemon juice : 3 tsp

Eno's fruit salt : 1 tsp


For tadka (tempering)

Oil : 1 tbsp

Mustard seeds : 1 tsp

Asafoetida (hing) - 1 tsp

Sesame seeds (optional) - 1/2 tsp

Green chillies - 1 chopped


Method :

In a bowl take the gram flour and semolina. Put in the yoghurt, salt, cilantro, lemon juice and green chillies into the flour and mix well to form a smooth batter. Add water if u feel the batter is too thick. See that the batter is nice and smooth and no lumps r formed. The batter should be of a pouring consistency.

Keep the batter aside and let it rest for an hour.

Now in a deep bottomed saucepan or pressure cooker... take some water and heat it at medium high. Place the cake rake into it. You can do this in a cooker too.

After the water starts to boil, turn down the heat to medium.

Add Eno to the batter and mix well. the batter will foam up. Now, quickly pour the batter into the greased cake pan.

Place the cake pan inside the saucepan/cooker on the cake rack. Cover the saucepan /cooker and steam for 10- 15 minutes on medium heat.

Test the dhokla with a knife. If the knife comes out clean, your dhokla is done. Off the heat and remove the cake pan out. let it cool to room temperature. Cut it into pieces.

In another vessel heat some oil and put all the ingredients of the tempering into the oil once the oil is hot enough. Pour the seasoning over the dhoklas and serve along with chutney.

I garnished it with some coriander leaves and sev too...Tasted good.:)


(Now some words about how to steam this dhokla. There are two ways to do it.

- One u can steam it easily in a pressure cooker, using a greased steel round pan (cake pan), pour the batter in it and steam for 10-15 minutes...or

- by steaming it in a deep bottomed vessel filling it with water (water level just enough to touch the base of the greased cake pan. Remember to keep a cake rack below the cake pan so that u dont burn the base of the dhoklas..) and covering with a lid. U can grease a cake pan, pour the batter and place it in this boiling water to steam. )


Your yum and fluffy dhokla is ready. Serve it with some tamarind or green chutney. Or crumble it and serve like an upma..:) Enjoy it. !


Thursday, March 5, 2009

Garbanzo salad / Sundal


This reminds me of Navarathri days in India. As a kid I used to go and see all the gollus(aarangement of dolls)...sing songs and come back with a packet of these lovely little darlings. Yummmm! How I used to love this as a kid, well I love it even now...:D This is like a salad...and is called as Sundal in Tamil....:)

Okie now we come to the recipe

Ingredients :

Garbanzo Beans /Kabuli chana - 1 Big Can
(if ur using dried ones...soak it overnight and then steam it in the cooker a bit)

Grated coconut - 3/4 cup

Mustard seeds - 2 tsp

Curry leaves - 2 twigs

Asafoetida - 2 pinch

Salt to taste

Oil - 1 tbsp

Green chillies - 2 slit lenghtwise

For garnish - Coriander leaves and grated Coconut


Method : Empty the can of garbanzo in a microwave safe bowl and wash the beans well in running water. Now Steam the beans in a microwave for 2 mins on high.

(I used the can hence this step.. if ur using dried beans and soaking it, Just steam it in a cooker and ur all set to make the sundal)

In a deep bottom pan take some oil and put mustard seeds and let it splutter. Then add green chillies and curry leaves. Add asafoetida and leave it on for few minutes. Add the coconut and stir fry for 5 minutes, until the coconut roasts a bit and gives out a nice aroma. Now add the Garbanzo beans and mix well. See that u do this gently u dont want to mash the Garbanzos...:) Add salt and mix well. Let the Garbanzo roast for sometime. Garnish with some more coconut and coriander leaves.


Serve hot with a bowl. Can be enjoyed as an evening snack!


Tuesday, December 2, 2008

Back With a Spicy bang! - Mirpakaya Bajji

Its has been such a roller coster ride. This whole year was so for me.... and know what the year isnt over yet. I had cousins over at my place, then I had been to a cousins place... and some family functions and birthdays and the big huge india trip......and so many other things...... phew...life sometimes gets so hectic.

Now, for my post after a long long time...:) Due to all these things that were happeneing with me I never got enough time to cook much. Just few days back the temptation of eating hot, spicy, yumm mirpakaya bajji...Ohh how I miss eating them. I remember I used to go out with my Vadina (my co sister) and relish on those yummy bajjis from street side thelas...Ohh how I miss India.(I just came back from india......:(... miss those glorious days spent there..)


Hmm anyways coming back to my bajji.... Do u know the best combination for these bajjis are murmura upma? Yeah, they taste yumm together...:) My Vadina taught me how to make this upma. Well anyways, this post is dedicated to the mirpakaya bajji so I will post about the Upma later.

Me and my hubby can live on it totally. Thats the love we have for these slender beauties. Anyways so here goes the recipe for these amazingly tasty bajjis.


Ingredients :

Big chillies - 8 (less spicy ones)

Gram flour - 2 cups

Ajwain - 1 tsp

Turmeric powder - 1 tsp

Salt to taste

Rice flour - 1 tbsp

Oil for frying

For the Filling :

Amchur powder - 2 tsp

Salt to taste

Coriander and Jeera Powder - 2 tsp

For serving :

Chopped Onions - 1 cup

Lemon juice - 2 tbsp

Chaat Masala - 3 tsp

Method :

Wash and slit the chillies lengthwise. Remove the seeds. If you are a spicy eater you may keep the seeds as it is.

In a seperate plate or bowl add the Amchur powder, salt and coriander& jeera powder, mix well. Stuff this filling inside the slit green chillies and keep it aside. This will reduce the heat from the chillies and make it tangy to taste....:)

In a bowl add the gramflour , turmeric, salt, ajwain, rice flour and some water and mix well. The consistency should semi liquid. not too thick not to watery. Your batter is ready for dipping...:)

Heat the oil in a Kadhai.

Dip the green chillies in the batter and fry in the heated oil till golden brown in colour. For a better texture I normally double fry these chillies. This is how u can double fry.....Once u fry the chillies by dipping in the batter and are out, again dip them in the batter and fry it again. This gives a thicker coating to the chillies and enhances the taste.....:) Your bajjis are ready to be served. Enjoy !

Serve the Mirpakaya Bajji in the hyderabadi style. Cut the Mirpakaya bajjis and stuff it with some chopped onions, chaat powder and lemon juice. Thats the hyderabadi style mirpakaya bajji.


Serve this bajji with Murmura Upma. This is the typical way of eating it.

Friday, June 20, 2008

Sabudana Thalipeeth/ Sago rotti and Tamarind relish ! - T&T, YRR,JFI,RM


When Zlamushka of Zlamushka's Spicy Kitchen announced the blog for this month's Tried & Tasted... I was so sure I am gonna participate in this one. This month it was cooking from Nupur's One Hot stove. I Also sending this to the Your Recipe Rocks event...started by Madhuram of eggless cooking.

I have always loved Nupur's site and her lovely recipes. When I saw the recipe of Sabudana Thanlipeeth in her site I was so sure I am gonna try it out.:) So here is the Sabudana Thalipeeth and Tamarind relish from Nupur's blog.

I am also sending the Sabudana Thalipeeth also known as Sago Rotti recipe to the Roti mela hosted by Srivalli..:)


Thie Sabudana Thalipeeth is a maharashtrian "Upvas" (Fast) recipe. So here goes the recipe. I haven't made any changes to the recipe given by Nupur. U can see her original recipe here. Anyways I am posting the recipe here.:)


For making this lovely recipe

You need :

Sabudana / Indian pearl Sago - 1 cup
Potatoes - 2 medium (boiled and mashed)
Roasted crushed peanuts - 1/2 cup
Cumin seeds - 1 1/2 tsp
Green chillies - 2 finely chopped
Fresh cilantro - 1/2 cup finely chopped
Sugar - 1 tsp
Salt to taste
Oil


Method :

Wash the sago well in some luke warm water. Drain all the water and add about 1/4 cup of water to it and leave it overnight or about 5 hours. Your sago will swell well and becoming a bit rubbery and soft. Keep it aside.


In a bowl put in the sago and all the other ingredients excluding the oil. Mix it all well in a nice soft dough. Now ur all ready to make ur thalipeeth.


Firstly take a square thick platic sheet. Brush the plastic sheet with some oil. Oil ur palms or u can even wet it with water....and take a ball of the sabudana dough and place it on the plastic sheet.


Press the dough in the centre with ur palm and make into a flat circle. Keep pressing and expanding the circle. See that u dont break it. Keep the rotti a bit think say about 2 cm in thickness.


Transfer it to a hot griddle, pour a tsp of oil around it and cook it until nice and crisp on both sides.Serve it with Sweetened curd/yoghurt or Tamarind relish....:)


Fast or no fast we can always enjoy this as a lovely evening time snack. My hubby loved it.. Enjoy!

----------------------------------------------------------------------------------------------

Tamarind Relish


Another recipe that I found and loved in Nupur's blog was Cynthia's Tamarind relish that she served with her Thalipeeth.......Yumm is the word for it...:D


As soon I read this recipe I knew it is gonna rock at my place. My hubby loves anything that is tangy. He is a big tomato and lemon fan hehhee...:P yup... Lemon rice and tomato rice and ofcourse puliyogare is his favourite. So when I saw this recipe I wanted to make this tangy treat for him. So here goes the recipe. I got it from Nupur's blog. Here is the original recipe.

You need:

Tamarind Concentrate - 2 tbsp

Onions - 1/2 finely chopped

Ginger - 1 " piece finely chopped

Garlic - 3 pods peeled and minced

Red Chilli flakes - 1/2 tsp

Cumin /coriander powder - 1 tsp

Jaggery - 2 tbsp

Salt - 1 tsp

Method :

Mix the tamarind concentrate in a bowl with 1 cup of water. Dissolve the tamarind well. If u dont have concentrate u can use the tamarind pulp. Soak it in 1 cup hot water for 20-30 minutes and later press out all the pulp and squeeze out all the seeds and fiber. You will have ur tamarind pulp and water ready.

In a small pan, heat some oil and put in the ginger, garlic and onions and saute and cook until soft and light pink in colour.

Now add the tamarind pulp and the other ingredients and boil until a bit thick or have a jam thickness. Adjust the amount or salt and other spices according to ur taste. You can store this in an air tight container and refrigerate.

I am sending this recipe to the JFI : Tamarind hosted by my Sig of live to eat.

Enjoy!!