WELCOME!


Powered by IP2Location.com

Sunday, August 16, 2009

Masala Utthappam


You all must have eaten masala dosa...but have u ever tired masala uttappam? I ate this first time in a restaurant near my place back in Thane. It was so tasty and yummy. So anytime u have the masala filling and dosa batter why not try this than the conventional Masala dosa..:)


Ingredients :

Dosa batter
Oil for cooking
Onion - 1 finely chopped
Chaat Masala - 2 tsp


For Spicy masala

Potaoes - 5 boiled and mashed
tomato - 1 chopped
Green chillies - 3 finely chopped
Ginger - 2 tsp
Garlic - 1 tsp (optional)
Fresh corinader leaves
Mustard seeds
oil
Salt to taste
Kitchen king masala - 1tsp (optional)

Method :

Firstly we will make the masala. Now this masal is similar to the masala dosa masala preparation. U can even use the leftover masala from masala dosa to make this. Anyways, In a kadhai take some oil and put in the mustard seeds. Let it splutter and add the green chillies, garlic and ginger. Go ahead and put in the chopped tomatoes along with all the powders. Mix well. Cook till the tomato is tender and the masala is cooked. Add in the boiled mashed potatoes and add to it a cup of water. Mix well and let it cool well. Garnish with fresh coriander leaves. Now ur spicy masala is ready.

Assembling the Masala utthappam. Pour a big laddle full of batter on the pan and spread it to make a nice thick dosa. Sprinkle the chaat masala and chopped onions. Let it cook for 1 minute and scoop in a spoonful masala on the utthappam and flatten it. Pour oil on the sides on the dosa. Let one side cook completely well and then flip it over to cook the other side. Pour oil to the other sides too and cook well. Ur masala Utthappam is ready now to relish.

Enjoy ! Have fun.


Wednesday, August 12, 2009

Sev Batata Puri


I am from Mumbai the chaat paradise of India. I love chaat items and I am lucky that my hubby enjoys it too....actually he is good at making these chaat items too. Will surely share few of his chaat Speciality with u guys later. So As we both like Chaat we often make it and sometime its our dinner...:) Unlimited chaat hehehe :P.

Sev batata poori is something i dont make that often mainly coz i dont get those flat pooris here that easily. And If I spot them in any shop... I stock my pantry with atleast 3 packs of these pooris hehehe :P. Sev is the thin noodles kind of snack made with gram flour. U can easily get it in any India store. Batata means Potato in Mumbai local language and Poori are normally small puffed hard shells but in this case....they r flat discs like canapes.

Anyways here goes the Sev batata poori recipe.

Ingredients :


Sev batata puris (flat ones) - 1 pack

Potato boiled and mashed -2

Garbanzo beans cooked and lightly mashed - 1/3 cup (optional)

Tomato finely diced - 1 cup

Red Onions finely chopped - 1 cup

Chaat masala - 2 tbsp

Salt to taste

Spicy Green chutney - 1/2 cup (optional) / u can even use red chilly powder :)

Sweet tamarind Chutney - 1/2 cup

Fine Sev - 1 1/2 cup

Fresh coriander leaves - 1 cup finely chopped

Method :

For Spicy green Chutney - Grind coriander leaves, green chillies and mint leaves together. Dont put too much water. Adjust the chillies according to ur spice intake. Ur green chutney is ready.

For Sweet tamarind chutney. Take tamarind water or tamarind concentrate mixed in water and boil it. Add jaggery and boil for 20 minutes.. once the chutney becomes a bit thick ur tamarind chutney is ready.

For the potato filling - Mash the boiled potatoes and the garbanzo beans together. Add salt, red chilli powder and little chat masala and mix well. Keep aside.

Making sev puri. In a serving plate arrange the pooris. Put a spoonful of the potato filling on the puri. Top the masala with a tsp of green chutney and a tsp of sweet chutney. Sprinkle onions, tomato, fresh sev and some chat masala on each poori. Garnish with chopped coriander leaves and Serve.

Ur simple and easy Chat is ready...:)

Tuesday, August 11, 2009

Vegan Chocolate Cake

Vegan chocolate cake for a dear friend. My dear childhood friend Krithika visited me here in US for the first time and that too with her new born baby girl. The day she was going to come to my house was her birthday..:) I wanted to make something special for her....and wts better than a sweet treat. As she was coming with her mom, and granny I wanted to make something eggless.

I found this awesome Vegan chocolate cake recipe in Madhuram's blog and I was so glad. This recipe is so simple to make and can be made with the ingredients readily available at home. Cool isnt it? Here is the actual recipe. I will list down the recipe and the small changes I made in it. The icing is not vegan. I used ready made buttercream frosting and I didnt have much time I just sprinkled some colourful ice cream sprinkles on it...:P easy way to decorate :)

Ingredients :

All purpose flour - 1 1/2 cups

Sugar - 1 cup

Salt - 1/2 tsp

Baking Soda - 1 tsp

Unsweetened Cocoa powder - 1/4 cup

Vanila extract - 2 tsp

Canola Oil - 1/3 cup

Distilled Vinegar - 1 tbsp

Cold water - 1 cup


Method :

Preheat the oven at 375 degree F.

In a bowl mix all the dry ingredients (flour, sugar, salt, baking soda and cocoa powder) together. Keep aside.

In another bowl take the water and mix in all the wet ingredients to it (oil, vinegar, vanila extract). Whisk well. Add this mixture to the dry ingredients and mix well using a hand blender. Blend till a nice smooth batter is formed.

Grease a cake pan with some butter (I used wiltons cake release. Its very very good, and the cake out out so well.) Pour in this mixture into the pan and even it out. Bake in the preheated oven for 25-30 minutes or until a tooth pick outs out clean. Off the oven and leave the cake in for 5 more minutes. Dont try to remove the cake from the pan now. The cake will break / crack. Let the cake cool well in the room temperature. Leave it for an hour or so.

Run a knife along the edge of the cake to remove it from pan. turn it upside down on a plate of serving tray and pat the bottom of the pan to loosen the cake.

Now u can serve the cake hot as it is with tea or coffee.

To frost the cake, let the cake cool completely. I left it out for another hour and Sliced it into 2 layers, then wrapped it with a plastic wrap and kept it in the freezer for 1 hour. Keeping it in the freezer helps the frosting to stay on the cake well. U can slice the cake into 2 layers if u want to frost in the centre.

Once the cake is cool. I frosted it with store bought buttercream icing and decorated with ice cream sprinkles..:) My friend loved it and I was so happy to see the smile on her face.

HAPPY BIRTHDAY KRITHIKA :)

Eggplant Roll-ups


This is one amazing Appeatiser that I have made till date. Its so simple to make and so tasty.
I wanted to make something simple and light for my dad. He is visiting us from india. I am so excited about his visit and I want him to enjoy this stay...:) I just started this and went of building this recipe according to my taste and it turned out so nice...:) I am glad I tried to experiment..:)

Anyways getting back to my eggplant...here is the recipe for the same. I have made a chinese style filling u can alter the filling according to ur taste.

Ingredients:

Italian / Chinese eggplants - 3
Low fat Cheddar Cheese - 1 cup
Pam spray

For the stuffing:

Onion / Green onions finely chopped - 1/2 cup
Bean sprouts chopped - 1/2 cup
Carrot julliened - 1/2 cup
Green Bell Pepper finely chopped - 1/2 cup (optional)*
Soya sauce - 1 1/2 tbsp
Red Chili garlic paste - 3 tbsp (reduce it if its too spicy)
Ginger - 2 tsp
Tomato Ketchup - 2 tbsp
Sugar -1/2 tsp
Salt to taste
Red chilli flakes (optional)*
Sesame oil - 1tsp


Method :
Clean and make thin slices of the eggplant lenghtwise. U will get long strips of the eggplant. Rub light salt on both the sides of the eggplant slices. Heat a Tava / Pan and roast the eggplant slices. Roast to an extend that the slices r slightly soft and cooked. This step is important to make the slices tender and easy to roll. Spray pam on it if u desire. Keep them aside.
Preheat the oven to 375 Degree F.Prepare the filling.
In a Deep bottom pan heat oil. Add the ginger, chili garlic paste and suate for a min. Add the onions and saute well. Add the sugar and mix well so that the onions r slightly caramalised. Now add soya sauce and the tomato ketchup and mix well till the sauce is nice and hot. Add all the vegetables one by one and mix well. Cover and cook for some time till the veggies are tender. Add salt and chilli flakes according to taste. Once the filling is ready keep aside.
Arrange the eggplant slices one by one of a working surface. Add layer of cheese on the effplant. Spread a spoonful of filling on the Slices evenly, Leaving an inch of the slice on one side. Roll the slices into a swirl roll and put a toothpick to make the rolls stand. Make rolls out of all the slices. Spray pam on a cookie sheet and arrange all the rolls on it. Top each roll lightly with cheese and bake for 10-15 minutes in a preheated oven. Serve hot with Tomato Ketchup.


Serve Hot. Enjoy and Relish with tomato ketchup....:)

Wednesday, July 22, 2009

Tofu Tikka Masala


It was a lousy spring evening and I was feeling so lazy. I didnt even wanna get up from the couch to open the door. Hmm somedays I do get this attck of laziness but then as we have to eat and cook I have to push myself to go to the itchen and start working...phew!.

That particular day hubby was graceful enough to offer to make some snacks for us...:DAnd he came up with this. I personally dont like frying much, but when ur getting things done for u without doing anything... the best thing is to keep quiet and enjoy hehehhe:P I am a devil na? hehehe

Anyways going to this recipe, it turned out so nice and tasty, a very good Appeatiser.

Ingredients :

Firm Tofu - 1 pack
Corn flour - 1 tbsp
All purpose four - 2 tbsp
Red chilli powder - 2tsp
Salt to taste
Pepper - 1 tsp
Kitchen king Masala - 1 tsp (optional)
Oil for frying

For Garnish:
Chaat powder
Onion slices


Method :

Open up a Tofu packet and drain out the water. Squeeze the water out of the Tofu. Wipe it with a kitchen towel to remove any excess water. Cut the Tofu in cubes and keep aside.

In a big bowl add the AP flour, corn flour, Red chilli powder, salt, pepper and kitchen king masala. U can Also add a tinge of soya sauce to it if u desire. Add very little water and make into a smooth paste. see that its not tooo watery.

Add the tofu cubes to this mix and coat all the tofu cubes with the batter. Leave aside for 5- 10 minutes.

Heat oil in a kadhai. Add the tofus to the oil and deep fry. See that the tofu doesnt stick to each other while frying. Once golden brown in colour, remove from out and drain out on kitchen towel so that all the excess oil is removed.

Now for serving. You can serve this anyway u want. I put these on a toothpick along with a piece of onion and sprinkled some chaat powder on it. Serve it hot along with some Tomato Ketchup.

U can even make chili tofu out of these or even tofu manchurian. We made chilli tofu with the leftover tofu but forgot to take any snaps :P hehhee. Enjoy this dish and have fun!

Yummy Tofu Tikka masala :D enjoy!

Tuesday, July 21, 2009

Jalapeno Pretzels - Baked


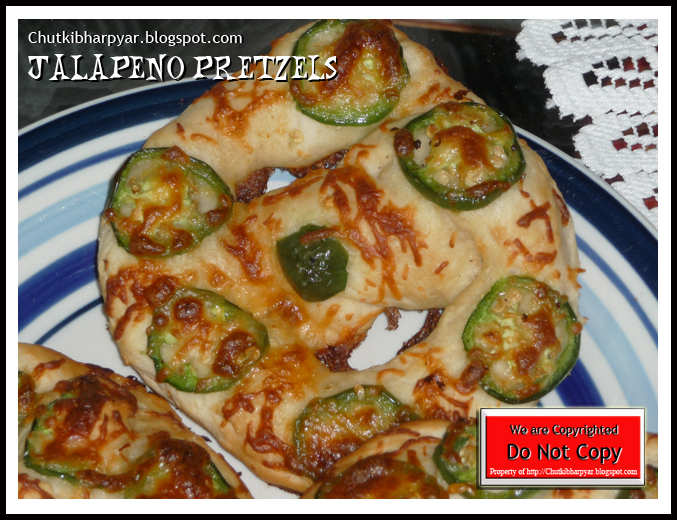
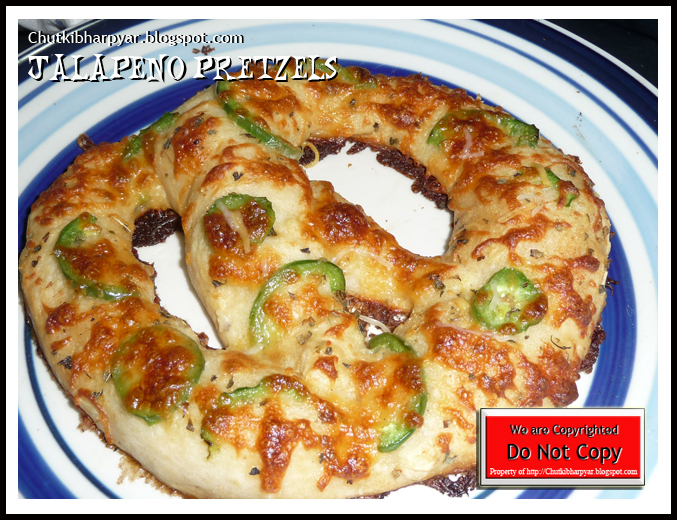
Who doesnt love pretzels and specially if its an Jalapeno Pretzels.... hehhe I can see all the spicy food eaters shaking their heads along with me. I was first introduced to this pizza with handle at Wetzel's Pretzel here in Los angeles. I normally cant eat jalapenos much, but when it comes to this I can keep hogging with tears running down my cheeks yet wont stop :P...hehhee. I instantly fell in love with it. From then, whenever I go for shopping I make a point to grab one of these. Its so filling and tastes so good.

I found out recently that not just Wetzel's Pretzels but almost all the pretzel centres in USA have these Jalapeno pretzels. I recently had one in Aunt Annie's. It was not as good as Wetzel's but yeah, it was Jalapenos okie :P

Did u know that soft baked pretzels r very very famous in Pennsylvania. U can find it in almost all stores and mall there? Well I didnt know but I remember seeing that in some show. Anyways now u wants to know about the origin right? Lets talk about this recipe... I combined the procedure and ingredients from 2-3 sites to get my own pretzel recipe. I got a bit confused with the yeast quantity..( I didnt see the amount of water I have to use to mix the yeast....hmmm :( and ended up with a watery dough... and then again ended up adding more flour and yeast hehhe) hence I didnt get the perfect knot on the pretzel and it looks all merged up :P

Well did u know that the calorie content in an Aunt Annie's pretzel is 310 and its very high in sodium? Thats coz they r normally fried. Hmmm yeah seeing that I felt y not trying making our favourite at home, thats way I know what I am putting into it... good or bad ;) So here is my recipe. I have used All purpose flour for this recipe... But u can make it even with wheat flour for making it more healthy...:D


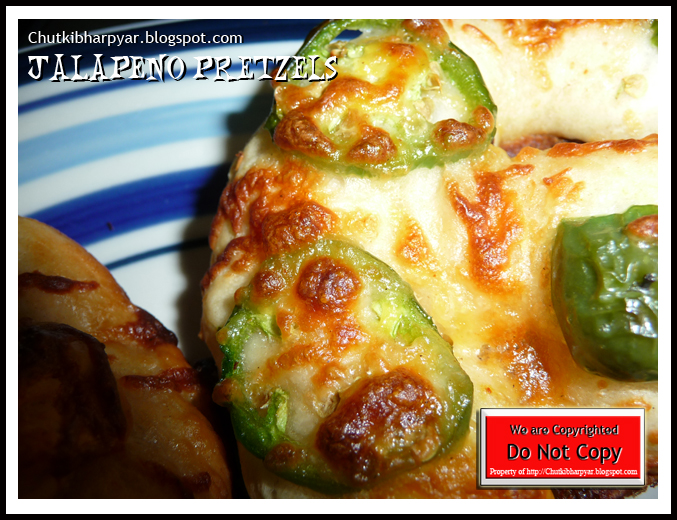
Wooo can u see the baked Jalapenos on that one.... I am sure that will make u drool over this one :) Isnt it??

I somehow dont like plain pretzels. I need the cheese and the butter grease on it for me to appreciate its genuine quality... hehehhe:P Anyways here goes my recipe. I took some tips from Divya's Dil-se blog too. Thanks Divya.

Ingredients :

Active dry Yeast - 2 1/4 tsp
All pupose flour - 3 cups
(If using Wheat flour - 4 cups )
Sugar - 1 tsp +1 tsp = 2 tsp
Luke warm water (for yeast) - 1/2 cup
Salt - 1 tsp
Olive oil - 1 tbsp
Baking Soda - 1 tsp

Options for caramalising the pretzel..

Milk - 1/2 cup
or
Baking soda - 2 1/3 tsp &
Hot water - 1 1/2 cup
0r
Eggyolk - 1
and 1 tbsp of water
Or
Maybe some sugar solution (check the video to understand about these toppings :D)

Other toppings:

Butter - 1 tbsp
Cheddar cheese - 1 cup
Jalapeno thinly sliced - 1/2 cup
Garlic powder (optionla)
Kosher salt


Method :

In a measuring cup take 1/2 cup like warm water and add 1 tsp sugar and yeast to it and mix well. Keep aside till the yeast froths well.

In another bowl add all the dry ingredients like the flour, salt, sugar and mix well. Slowly add the yeast mixture and knead the dough for 8-9 minutes. The dough will be elastic which is okie...:) Mix well until smooth :). Add a tsp of olive oil on the dough and mix well so that the oil coats the dough well and that the dough doesnt stick to the bowl. U can even use a fresh greased bowl instead...Cover with a cling wrap and keep aside for 1 hour or so.

Preheat the oven at 450 degree F.

After 1 hour u can see that ur dough has doubled in size. Now make small tennis ball size rounds and keep aside. It will make around 11 balls. Take each ball and roll it into a long medium thickness thread and twist to form the famous pretzel shape. You can either form a knot or else u can place the ends across on each side...:) You can refer to this site for tricks for this step. You can check this video to know more about shaping the pretzels and making the colour nice and golden brown :D

Now that ur pretzels r shaped now comes the turn for the topping. Before we start with the topping we have to think how we r going to make out topping stay on oyr pretzels and also how to get that caramalised brown colour on our pretzels.

Commercially they use a product called lye which is very corrusive and as we r trying to making something healthy (before than store bought stuff) we dont wanna handle anything that damages our tissues right? So what else can we use. I have given different options in the ingredients and also the video that I shared tells u in detail what all can u use. For this recipe I have used Baking soda alone. we can combine it wil Egg yolks to make it more golden. I skipped it...:)

In a bowl take nice hot boiling water. Add baking soda to it and mix well with a spoon. Add the shaped pretzel in the water and leave it for like 30-40 seconds. Leaving it for this much time is important orelse ur pretzels wont get that golden colour...:) Take it out and place it on a lined cookie tray. Use lined tray to make it low cal... greasing is no way better right?

Now garnish ur pretzels with some kosher salt, sliced jalapenos and top it with some cheddar cheese as garnish. U can add garlic powder if u wish. Now ur pretzels r ready to be baked. Put them in the oven for 8-10 minutes. Once the pretzels become golden on top u can take them out and serve hot...:)

Hope u enjoy these pretzels.

I have tried to share as much information possible so that u can enjoy these lovely pizza with handles at home...:) Do leave ur comments and suggestions :D
Enjoy!

Monday, July 20, 2009

Tomato Rice by Hubby :D

Ohh.... I did I forget about this one. I had posted a very touching post about how my hubby had cooked for me when I was sick and promised that I will post the recipe soon and conviniently forgot about it.... hehehe:P here is the link to that post...

Well thanks to my lovely friend Meenakshi, who reminded me about this and asked me to post the recipe, I am going to complete this ode to my sweet hubby....) who took such good care of me... when I needed him the most...:) Love u Sweetheart !

So here goes the recipe.


Ingredients :

Basmati Rice - 2 cups
Tomato Puree - 1 can or Fresh tomatoes - 5 medium finely chopped
Roasted salted Peanuts - 1/2 cup
Onions fiely chopped - 1
Jeera - 1 tsp
Ginger, finely chopped - 2 tsp
Green chillies - 5 slit lenghtwise
Curry leaves - 1 sprig
Turmeric powder - 1 tsp
Coriander powder - 2 tsp
Garam masala - 2 tsp
Fresh corinader leaves
Asafoetida - a pinch
Salt and Pepper to taste
Lemon juice
Oil - 3 tsp

Method :

In a kadhai take oil. Once the oil is hot add the jeera, once that splutters add the green chillies, ginger, curry leaves and peanuts. Stir for a minute and add the onions and turmeric powder. Stir fry till the onions r transparent. Add the chopped tomatoes and cook till they r tender. Add the garam masala and coriander powder and stir fry. At this time u can go ahead and add the asafoetida, salt and pepper. Stir fry till all the water is almost gone.

Add the rice to this mixture and stir fry for sometime. If u feel the mixture is too tight add a spoonful of oil and mix again. see that the rice is roasted a bit..:) Keep stirring so that the rice doesnt burn. Now u can put 2 cups of water to this and close with a lid and let it cook on medium low flame orelse u can just empty all this into a rice cooker (if putting in the rice cooker add a tsp of lemon juice to this. The lemon juice helps the rice to remian seperate) and let it look. Hubby did the later as its much easier. U can do either.... both the ways it will taste good..:)

Once the rice is cook but yet not mashed up, remove from flame. garnish with fresh corinader leaves and lemon juice. Mix well and serve hot with raita.:)

ENJOY!

Monday, July 13, 2009

Vegetable Lasagna rolls


We both love lasagna but I somehow never attemped to make it at home, maybe coz I somehow cant just have lasagna for my meal. hehehh Yeah I know its funny but thats the main reason. I have seen that lasagna is easy to make but yields a large quantity at a time. As I didnt wanna have just lasgna for dinner I was thinking how I can minimize the bulk quntity that a original lasagna recipe produces...:P. And Tada...! I landed up with this recipe...:D

I remember seeing some recipe like this in the new menu of Olive garden.We were almost tempted to order it and then we realised it has beef in it and stopped ourselves...:P It happens so often with vegetarians that u love the picture on the menu and r so tempted to try and then all ur desires r dampened by the waiter who informs u that all this time u were actually drolling or a chicken/ deef or any other meat dish... hmmmm. Thats what literally happened with us that day....:(

I thought y not try it out at home in our own vegetable version...:D So here we present to u - Vegetable Lasagna Rolls :P - Nothing non-veggie about it ;) hehehe ) . Hope u try it ad enjoy it as much we did....:) This makes a very very good appeatiser too and yet is so filling :D


Ingredients :

Lasagna sheets - 15
Spinach frozen - 2 cup (thawed and water squeezed out)
Shredded parmesan Cheese - 2 tbsp
Sweet corn kernels - 1 tbsp
Olive oil - 3 tbsp
Garlic cloves - 4 finely chopped
Ricotta Cheese - 3/4 cup
Chopped mushroom - 1 cup
Dried / fresh oregano - 3 tsp
Dried / fresh Basil - 2 tsp
Mozerella cheese shredded or sheets - 1 cup
Salt & Pepper - according to taste
Store bought Prego sauce / marinara sauce - 4 cups


Method :

Preheat the oven to 450 degree F.

Boil the water in a big vessel. Add salt and oil to the water. Now add the lasgna sheets. See that u use fresh and good quality lasagna sheet as old sheets will break into pieces when ur trying to roll it.

Firstly make the filling as u have to work fast once the noodles is done. Orelse u can work simultaneously when the noodle is cooking.
In a big bowl add the ricotta cheese and cream it well. Add the thawed spinach, garlic,mushrooms, oregano, basil, salt, pepper and mix well. Finally add the parmesan cheese and corn kernels and mix well. Keep aside.

Cook the Noodles until its tender enough to roll yet firm to bite. Drain the water and arrange the noodles seperately on a foil sheet, so that it doesnt stick together.

Grease a 13X9 inch glass baking dish with olive oil. U can use any glass baking dish..but I prefer this one..:). Pour 1 cup of prego sauce and spread it evenly on the baking dish.

Work on 4 noodles at a time on a flat surface. Spread 3 tablespoon full of the cheese and spinach filling evenly on each lasagna sheet. Starting at one end roll each noodle like a jelly roll. Now lay the roll on the Baking dish, seam side down. Roll all the noodles this way and arrnage them in the baking dish. See that the rolls dont touch each other. Pour 2 cups of prego sauce evely on top of the rolls. Garnish with pepper, mozerella sauce and some oregano which is optional. Cover the dish tightly with an aluminium foil and bake for about 20 minutes until the sauce bubbles a bit.

Uncover the baking dish and bake again for 15 minutes or till the cheese on top becomes golden brown in colour. Off the oven and let the lasagna stay in for 10 minutes. Serve hot with the left over prego / marinara sauce.


Variation : I didnt use the mozarella cheese for the topping / garnish as I was trying to reduce the intake of cheese. Instead I topped each roll with a blob of feta cheese... which was okay in taste.:)


Hope u enjoy making these lasagna rolls as much as I did...:) Its a real confort food and I no more get overwhelmed buy this Lasagna...:P

ENJOY!!

Vermicelli Pasta or Semiya Upma


Vermicelli originates from Italy and means "Little worms" by literal meaning...:) It is a type of pasta...just like spaghetti but is much thinner than Spaghetti. This type of pasta was introduced in italian cooking in the 14th - Century.Thats the history of Vermicelli.

Its a long journey from Italy to India. In India vermicelli is known as Semiya or Sevaiya. Onother big difference in thos vermicelli pasta and the semiya that we get in india is the flour it is made of. Vermicelli pasta is made of durum wheat whereas Semiya is made of semolina.

Anyways the other day I get to our local grocery shop and got this weird looking string kinda thing...which did look like semiya but was in a coil shaped compared to the normal broken form of the semiya we get back in india. But anyways I bought it, and ended up making this pasta upma.....for this u need....


Ingredients:

Vermicelli Pasta - 1 pack

Onions - 1 finely chopped

Green chillies - 3 slit lenghtwise

Curry leaves - 2 twigs

Jeera - 1 tsp

Peanuts - 1 cup

Salt to taste

Oil

Ghee - 1 tsp

Lemon juice

Coriander leaves for Garnish


Method:

Cook the vermicelli pasta as directed in the package. drain and keep aside.

In a kadhai or a thick bottomed vessel add the oil and heat it. Now add the Jeera seeds and allow it to splutter. Add the green chillies, curry leaves and onions and saute well. Once the onions r transparent, add the peanuts and sauter for 5 mins.

Finally add the cooked vermicelli and mix well. Add salt and toss it once more.Remove from flame and garnish with coriander leaves and lemon juice. Top it with a spoon of ghee for the ultimate taste. mix and serve hot :) If u wish u can skip the ghee too..:)

It makes a great brunch meal or evening tiffin...:) Its our lunch time favourite...:D


Enjoy!!

Friday, July 10, 2009

Herb Potato


Nowadays I have become very fond of these red potatoes.... I used to use golden or russet potatoes but now I like these red potatoes for my dailiy cooking. I got to know few facts about these red potatoes and I would be glad to share it with u all...:)

How do u select a good quality red Potato? : Good-quality red potatoes will be firm, smooth skinned and have a bright red color to it. They should have few eyes, and those few eyes should be shallow. I also found a nutrition chart for a Red potato. 1 medium sized potato has around 120 calories. It is fat free , Very low in Sodium, Cholestrol-free, Source of Fibre and High in Vitamin C.

This recipe is something I make whenever I have some fresh herb at home and I need to finish it off. I make a large quantity of these as both me and my husband love it. So here goes the recipe...

Ingredients :

Red Potato - 6 medium

Fresh herbs - whatever u have.... how much ever u have (I used thyme, rosemary, sage and majoram)

Dried basil - 2 tsp (optional)

salt to taste

Fresh mint / corinader - 2 tbsp

Pepper - 2 tsp

Lemon juice - 1 tbsp

Olive oil - 2 tsp


Method :

Par boil the red potatoes. See that u dont make them muchy. They should be cooked yet a bit crisp. let the potatoes cool.

Clean and finely chop all the fresh herb.

Prepare the dressing. In a big bowl add the lemon juice, salt, olive oil, black pepper and mix well. Add the chopped herbs to this and mix well. Keep aside.

Chop the potatoes in quarters and put them In an big serving bowl.

Add the dressing to it and toss well so that all the potatoes r coated with the dressing...:) . garnish with chopped mint or coriander. Serve cold...:)

Enjoy as a side salad....:)


Thursday, April 30, 2009

Dahi Wale Aloo


I am a potato fan... whenever I am bored or stuck on what to make to go along with chapati the only vegetable (root) I can think of is Potato. Mainly coz its always there at home (I always keep it handy. Its like tissue rolls, refill as soon as its over..:P) and secondly coz anything u make with potato kind of tastes awesome and yet so simple to make...:)

Dahi wale aloo is a very simple and creamy potato gravy curry and it goes so well with phulkas..:) I make it very often at home.It can be made with just the potatoes... I have added tomato to the dish to make it more tangy but if u dont have tomato u can always skip it..:) So here goes the recipe...:)


Ingredients:

Potato - 3 (parboiled and cubed )

Tomato - 1 Chopped (optional)

Turmeric powder - 1 tsp

Dhania - Jeera Powder - 2 tsp

Garam Masala - 1 tsp

Salt to taste

Red Chilli powder - 1 tsp

Jeera (Cumin seeds) - 1 tsp

Hing (Asafoetida) - 1 or 2 pinches

Ginger - 2 tsp

Mint leaves - 3 tsp finely chopped (optional)

Green chillies - 1 tsp

Yogurt - 1 cup

Oil or Ghee - 2 tsp

Coriander leaves for Garnish

Method :

Firstly heat the ghee and when it gets hot enough, add the cumin seeds and a pinch of hing and let it splutter. Once the cumin is done add the finely chopped ginger and green chillies and saute it till it browns up a bit.

Now, reduce the flame and add the yogurt at intervals (divinde the yoghurt in 3 parts) and stir it well so that the yoghurt blends with the masala. See that there are no lunps. Stirring fast avoids lumps so do it..:)

Add all the other ingredients including the boiled potato and mix well. (dont add the mint and coriander leaves now...:)..keep it aside for garnish )

Stir well to see that everything is blended well nicely. Cook the potaoes on high heat until it fries a bit. Pour Aproximately1 cup water if u think the curry is too dry and let it simmer for 15-20 minutes.
Add the fresh mint leaves and cover with a lid so that the mint leaves wilt in the heat of the curry. Mix well and garnsih with coriander leaves. Serve hot along side of pickle and chapatis.


Serve hot with phulkas. Enjoy with awesome gravy bhaji.

Wednesday, April 22, 2009

I love your blog Award...:)


Just 2 days back one of my sweet blogger friend and alos a dear friend in orkut awarded me with this cute little award. I am just ovwerwhelmed to see it. Its been a long time I have posted any awards in my blog...Thanks Kavya for adding this to my shining award list...:) It really feels so nice when someone says they Love u right? And I know how my blog feels now...:D

As we do with all the awards I wud love to pass it to 5 bloggers whose blog I Love....

Cham of Spice -Club

Madhavi of Vegetarian Medley (glad I got a chance to taste her cooking in person...)

Ramya Bala of Ramya Cooks

Suma Rajesh of Suma's Cuisine

Uma of Essence of Andhra

Congrats Girls and I just simply love ur blogs... Keep cooking and keep sharing...:)

Nutty Banana Bread


Yummy yummy yummy... This is the first time I ever tried making banana bread and I am just loving it. One of my friends in orkut shared this amazing recipe with me...And as I had so many overripened bananas wts better than baking a banana bread? So here it goes.

I made this recipe using all purpose flour but i wud suggest u to use wheat flour as it enhances the taste.:)

Ingredients:

1 cup White Sugar

1/2 cup unsalted butter (U can even use oil instead of butter)

2 Eggs

11/2 cup All Purpose Flour (or wheat flour)

1 tsp. Vanilla Extract

4tbsp Buttermilk

1tsp Baking Soda

3 Mashed Bananas

1 cup Chopped Nuts (walnut) U can add any other nuts u want...(I added prunes and chocolate chips to the bread batter)

1 pinch Salt

I made changes in this recipe when i made my next bread well anyways that a different recipe all together...:P

Method :

Pre-heat oven at 350 degree Fahrenheit (175 degree Celsius).

Take a nice metal bread loaf pan...or u can even use the foil loaf pans that u get in market.

Grease and flour the cake pan. How to do this? Well just apply cold butter to the insides of ur pan. Put 1 tbsp of flour inside the pan. Now cover the pan with a cling wrap and then shake it well so that the flour coats on all sides of the pan. This is an easy and mess free way to do this.

Next, In small bowl sift together flour, baking soda and salt.

Separate the egg whites and the yolks and keep aside.

Mash the bananas in a seperate bowl.Keep aside.

In a big mixing bowl cream butter and sugar together. Now add the egg yolks and vanilla extract and beat well.

Now mix in the mashed bananas. next add the flour mixture alternately with the buttermilk to the creamed mixture. Mix with light hand only to combine, and not too much. Stir in the nuts.( In my case the assorted nuts and the chocolate chips...:)...)

In another bowl beat the egg whites until stiff. See that u dont beat too.Fold the egg whites in the batter and mix well with light hands. Pour the batter into the greased pans. Decorate with banana slices or nuts...:)

Bake at 350-degree Fahrenheit for 30 minutes or until a toothpick comes out clean. Remove from oven and cool it. Cut into slices and serve hot along with ur coffee and tea.


Amazing Isnt it?? Do try this recipe and let me know ur views...:D


Wednesday, April 8, 2009

Red Velvet cake - Happy Baby shower..!


Babies......Babies.......Babies Galore!

Booties and rattle, diapers and swing.....

"Here comes the Baby!" comeon lets Sing!...

Wow I just now discovered I am a poet hehhe... wrote that rhyme in a click. Hmm anyways babies r something that inspire u to do so many things...write poetrys, be responsible and even change ur whole lifestyle.

One of my good friends here in Los Angeles is pregnant and I am so so happy for her. She is the first friend I made in US... and its a friendship to cherish. Seeing her I can understand that babies r such a big big commitment. All the things they had to prepare for the arrival of the little one. Buying the stroller, car seat, crib and then other small small stuff and then setting it up too. It was such a wonder to see them being so passionate about these things...:) I guess the babies make us grow up,........... grow up from our young happy go lucky age to become more resposible and mature...:). This somehow reminds me how we used to set up the whole house and the aasan for lord Ganesha's arrival...? this is somewhat the same isnt it?? hehehe...Now as the time is near and the wait is almost over... we all wish she has a safe and easy delivery. She has already passed her due date and the baby is expected anytime...:) Friends do pray for my lovely friends. It is their first baby. Pray she has a safe delivery and the baby and mom both be healthy..:)


This cake is something I made for both of them. For wishing them luck..:) They had a baby shower at their place which was completely arranged by both of them with rituals and all.It was amazing and sooo beautiful arranged...:) As it was her baby shower and they both were the ones who were running around planning things.... I wanted to make something special for them and wish them luck for the arrival of the little on...

So here it is my first special cake from scratch...:) and this is also my almost first experience with icing and fondant...:) but I enjoyed it sooooo much and I am sure I will be doing it again. ofcourse my friend Hetal (Isha of Isha's kitchen ) did help me making this one...and also making the fondant deco... even thought being her first time even seeing fondant...:) Thank u Hetal... we do make a great pair...:D


Cute isnt it? My experience with fondant was good..:) I was kind of blank first about how to design the top of the cake... I have never done icing before this...(using the tip and buttercream and all....never done that) I have worked with fondant earlier....(Once I made a bow on top of the cake using fondant...:) and this is the second time I am working with it... It was so nice.. specially making the baby and the baby stuff...:) it felt so nice and so cute. I am sure u will agree with that Hetal...:) isnt it?

Making the baby was the most fun... the hair and the pacifier of the baby was fun too.. though I wasnt sure that looks like a pacifier hehhe. My DH helps me and guided me on the shapes of the baby stuff.Over all it was a great experience and I am sure I am gonna try this fondant work again.:)


Anyways now going to the recipe of this cake. I ate this cake once in CPK when we went for Valentine's day and wanted to try it. So when I saw this recipe in Joy of baking site... I jumped and wanted to try it immidiately. So here goes the recipe of this yummy delicious soft and creamy cake....I am sure you will love this one.. as much as we all do..:D To make this cake you need...

Ingredients :

2 1/2 cups sifted cake flour
1/2 tsp salt
2 tbsp Dutch-processed cocoa powder (I used hershey's)
1/2 cup unsalted butter, at room temperature
1 1/2 cups Granulated Sugar
2 large eggs
1 tsp pure Vanilla extract
1 cup buttermilk
2 tbsp liquid red food coloring ( I also used the indian powdered food colour...:) alongside)
1 tsp white distilled vinegar
1 tsp baking soda

For the Cream Cheese Frosting: (this frosting is what give major flavour to this cake.)

1 1/2 cups heavy whipping cream
8 oz cream cheese, room temperature (1 packs philadelphia creamcheese will do)
8 oz tub of Mascarpone cheese, room temperature (As i didnt get mascarpone cheese, I used Cream cheese here too..)
3/4 tsp pure vanilla extract
1 cup confectioners' (icing or powdered) sugar
2 cups dessicated sweetened coconut for garnishing


Method:

Preheat the oven to 350 degree F.
Grease two 9" round cake pan. I used the Witon Cake release and it worked like magic for me.You can even line them with parchment sheet for easy or no clean work. Set aside.
In a mixing bowl sift together cake flour, salt and cocoa powder. Set aside.
In a bowl beat the butter, using a hand mixer till smooth for about 1-2 minutes. Add the sugar and beat again until light and fluffy. Add the eggs one by one, beating in between. Scrape the sides of the bowl and then go ahead and add the vanilla essence. Beat well until everything combines well.
In a measuring cup whisk together the buttermilk and the red food colour. Adding buttemilk to the cake gives it a moist and tender crumb. Buttermilk has a nice thick creamy texture with a rich tangy buttery taste that makes baked goods tender and soft. While keeping the mixer on a low speed alternately keep adding the flour and the buttermilk mixture in 3 additions, begining and ending with the flour. Mix well.
In a small cup mix the baking soda with the vinegar. Allow the mixture to fizz and bit and then quickly fold it into the cake batter and mix well.
Now u have to be quick and divide the batter into the two greased pans. Smooth the tops of the batter with a spatula or spoon. Bake in the preheated oven for Aprroximately 25-30 minutes or until the toothpick inserted in the cake comes out clean..( mine cooked in approx 25 minutes.) See that u dont over cook the cake orelse the sides will burn and become hard. Once the cake is nicely baked...take it out of the oven and let it cool in the pan on the cake / wire rack for 10 minutes. Invert the cake on the cake rack and let it cool till room temperature. Once its a bit cool place it in the freezer for atleast an hour or so (this is done to make filling and frosting the cakes easier.)
In the meantime prepare your cream cheese frosting for the cake. In a bowl, using a hand mixer process the cream cheese and the mascarpone cheese ( I used cream cheese instead and its didnt make any difference to the taste..) until smooth. Add the Vanilla extract and confectioner's sugar and beat well. (Be sure u use confectioner's sugar...I used granulated sugar by mistake and my frosting ended up being a bit drippy...:P I did manage to correct it... but please dont do that mistake and be careful..what sugar ur adding..)
In another bowl take some whipping cream and beat it well till stiff peaks are formed.Now quickly but gently fold in some of the whipped cream into the cream cheese to make it light.Beat gently.You can actually feel the cream cheese frosting becoming light and fluffy. Add the remaining whipped cream in 2 seperate additions ,beaten well in between. If the frosting is not thick enough to spread, cover it and place it in the freezer for an hour or until it is thick enough to spread.
Now moving to the assembly of the cake...
To assemble cut each layer of the cake horizontally with the serrated knife. I used the levelling tool from wilton.Did made my job so much easier. Check their Cake levelling tutorial here.
You will now have 4 cake layers, top of the cake facing down on ur serving plate or cake circle.
Spread the bottom most layer with some frosting.Cover it completely. Place another layer of the cake on top of the frosting and continue covering it with more frosting. Do the same with the rest of the cake layers. Once all the layers r done. Frost the top and sides of the cake with the frosting. Once u have put one coat of the frosting, keep the cake in the freezer again for 1/2 and hour. Now, take the cake out and frost it again with the left over frosting and then top it with some dessicated sweetened coconut. See that the coconut covers the top as well the sides of the cake. Now ur cake is ready to be eaten..:)
Or u can just go ahead and decorate it using fondant or icing...:) for a special occassion like the one I made this cake for...:)
Our dear and lovely friends...:)
When my friend saw this cake she was surprised and the look on her face was enough. it paid off all the effort we took to make this cake. Love u neha... hope u have a safe and easy delivery. just want to let u know that we all r eagerly waiting for the little one...:) as much u both are..:D god bless you.! Hope u all wish her the same...:)
God bless the mommy and Daddy-to-be...:)

Sunday, March 29, 2009

Baked Bean Crisps


I had deep fried French beans crisps at P.F Chang restaurant a few months back. I really liked it so much that I wanted to try it at home. Just made some modifications. I baked these crisps instead of deep frying them. It makes a great evening snacks...:) Hope u enjoy eating this as much we did. What great way to eat the healthy beans? the healthy way ofcourse...:) and this is it.....:P

Ingredients:

French beans - 1/2 pound

Thick Yoghurt - 1 1/4 cups

Sour cream - 1/3 cup (optional)

Salt to taste

Cheddar cheese - 1/2 cup (optional)

Pepper - 1 tsp (add to taste)

Lemon extract - 2 tsp

Cayenne pepper / Red chilli powder - 1/2 tsp

Dried Oregano - 2 tsp

Bread crumbs - 4 cups

Oil spray

Method:

Preheat the oven to 375 degrees F.

Clean and cut the ends of the french beans. Steam the beans in a cooker or in the microwave till tender and well cooked. Keep aside to cool.

In a big mixing bowl add the Yoghurt and beat it well, until smooth and creamy. Mix in the sourcream. This just adds the tartness to the batter. You can skip it too and instead add some extra lemon extract..but caution! this will make the batter very watery....:)

Now add the grated cheddar cheese and mix well. Add all the other spices (except bred crumbs ) and mix it well until smooth and thick. (this mixture tastes great as a dip too...:P yummmmm!)

In a plate spread the bread crumbs.

Coat the steamed beans with the yoghurt mix and then roll in the bread crumbs. Place them in a cookie tray (baking tray) one by one. Spray the oil spray over the beans and bake them in the preheated oven for 20 to 25 mins or until the beans becomes lightly brown on top..

Your Bean Crisps are ready to be served...:) Serve hot with tomato ketchup.

Saturday, March 28, 2009

Red onion n Peanut chutney in Thai Style with Idlis

I have always loved the smell of freshly made chutney to go with the steaming hot idlis. Its so delicious, that I dont have words to explain it. I remember my mom making this awesome coconut onion chutney for me for my lunch box. And I also remember the way my friends used to dig on the chutney and idli.I rarely used to get more that 2 idlis and used to end up buying something from the canteen hehehhe. Later,I used always carry a big tiffin box if I took idlis and that onion chutney for lunch, I dont wanna go hungry u see? hehehe.

Anyways after 2 years of being in US i finally got my 7ltr pressure cooker and steel idlis plates when I went for a 3 months trip to india. I am so glad I got it.... Now I can have hot idlis whenever I want to.... I missed it so much these 2 years... Just cant explain how much I missed them...:) Anyways, so finally my cooker and idli stand is here and I decided to try it out with some regular idlis. Nothing fancy here....:)

When it came to making the chutney I decided to give it a twist and thought of making a red onion chutney.... the way my "Amma" used to make. But then as I had very little coconut left in the freezer, I decided to twist it with some roasted peanuts instead and thats when this thai twist chutney was invented...:) Anyways so here is the recipe for my red onion and peanut chutney and to make it you need....


Ingredients:

red onion - 1 chopped in big chunks
Grated coconut - 1 or 2 tbsp
Red chillies - 2 to 3
Ginger - 2 tsp
Roasted peanuts - 3/4 cup
salt to taste
Sugar -1 tsp
Basil dried or fresh - 1 tbsp

Method:

Put all the above ingredients in a blender and blend into a smooth paste. Add some water and blend again to get a nice and creamy consistency.You chutney is ready.

If u dont like the taste of raw onion, just saute it in little oil for few minutes before blending it with other ingredients.


Enjoy ur chutney with steaming hot Idlis or crispy dosas..:)

Minestrone Soup


This is a very very easy soup and whenever I remember this soup, I remember Olive Garden. Yeah I am sure many of ur feel the same. I think we get the best minestrone soup in Olive garden...atleast from the places I have tried...:)

I was just sitting on the couch and thinking of what to make for dinner. Something light and nice and easy to digest. What better than this simple and flavourful soup, which can be made with veggies and spices that r easily available at home. This simple dinner along with bread toast was ready in just 30 minutes...:). Yumicilious.....:) So here goes the recipe. Hope u enjoy this simple soup...:)


Ingredients :

Carrots - 1/2 sliced

Onions - 1 finely chopped

Celery - 1 cup finely chopped

Diced Tomato - 1 can medium size (u can use 4-5 fresh or combine both can and fresh ones for more flavour)

Peas - 1/4 cup (optional)

Shell pasta /Elbow pasta - 1/2 cup (uncooked)

Zucchini - 1 sliced

Garlic pods - 7 finely chopped

Vegetable stock / Water - 5 cups

Garbanzo beans - 1 cup

Oregano - 4 tsp (fresh or dried)

Basil - 2 tbsp (fresh or dried)

Pepper - 2-3 tsp

salt to taste

Olive oil

Italian parsley for garnish


Method :

In a big pan add some oil and heat it well. When hot enough add the garlic and saute for few minutes. Now add the onions and saute well till the onions are transparent.

Now add the stock / water and bring to a boil. Add all the chopped vegetables and mix well. Add the spices, salt ( be careful while adding salt if ur using vegetable stock, as the stock may contain some salt in it as preservatives) and let it boil for like 10 minutes, until the veggies cook a bit. Now add the garbanzo beans and cook covered on medium flame for 25 minutes.

Now after 25 minutes stir the soup well. If u think the soup looks too thick or too chunky add some water to it. Let it boil a bit and then go ahead and mix in the pasta. Stir well and cook it covered for another 10 to 12 mins. By now u can smell the minestrone soup. I felt as if I was in Olive garden...:) Well once the pasta is cooked u soup is ready for serving...:)


Garnish with some fresh parsley leaves and serve hot with some ciabata or fresh bread...:) It makes an awesome dinner...:D specially in winters...:) Have fun

For variation: You can add more vegetables in this soup, like potatoes or corn kernels..:)

Enjoy making this awesome soup...:)

Wednesday, March 25, 2009

Lobiya Masala & my 150th Post


Yipeeeeee....! I am 150 posts old...:D Cooooool.... and its time to have a mini celebration...:d Thank u all my friends and other bloggers who helped me thru all my troubles...with ur lovely words and comforting support. Love u all...:) Thank u once again !


I am not a big fan of Lobiya (arabic) known as black eyed beans and also known as Chavali in hindi. But i do like the fresh black eyed peas which I made a bhaji out of to eat along with chapati.

Some facts about Lobiya: "Originally native to Africa, but widely grown in many countries in Asia, the black-eyed pea was introduced into the West Indies and from there to the Southern United States as early as the 1600s in Virginia. Most of the black-eye pea cultivation in the region, however, took firmer hold in Florida and the Carolinas during the 1700s, reaching Virginia in full force following the American Revolution. [1] The crop would also eventually prove popular in Texas. Throughout the South, the black-eyed pea is still a widely used ingredient in soul food and various types of Southern U.S. cuisine. The planting of crops of black-eyed peas was promoted by George Washington Carver because, as a legume, it adds nitrogen to the soil and has high nutritional value. Black-eyed peas are an excellent source of calcium (211mg in a 1 cup serving), folate (209mcg), and vitamin A (1,305 IU) among other nutrients"

Traditionally lobiya is supposed to be eaten for goodluck on the "New Year's Eve" in the southern American region. The same is the custom in many other countries. Actually I remember my mom making sweets using lobiya known as "karamani or payar" in tamil. So this is also a tradition in southern part of india I guess... hehhe..:) Nice discovery right?Anyways enough of the history of this bean. Well I came to make this recipe coz I had lot of frozen lobiya in my freezer. So here goes the recipe....

Ingredients :

Frozen Lobiya - 2 cups (thawed at room temperature)
Onion - 1 finely chopped
Tomatoes - 2 finey chopped
Green chillies - 2 slit lenghtwise
Minced Ginger - 1 tbsp
Garam Masala - 2 tsp
Salt to taste
sugar - 1/4 tsp
Green corinader leaves for garnish
oil
Jeera - 1tsp


Method :

Thaw the lobiya and steam it in a microwave for 4 minutes (high).

In a kadhai heat the oil and add the jeera. Allow to splutter and then add the ginger and green chillies. Saute for few minutes. Now add the onions and mix well. Cook till the onions r transparent. Add the tomatoes and cook till the tomatoes r tender. Add the salt, sugar and garam masala. Mix well. Add the lobiya mix well. Add 1/2 a glass or water and cook it covered for 5 minutes on medium heat. Stir in between. Cook till the water reduces a bit and the bhaji is no more liquidy.

Garnish with corinader leaves.

Serve with hot phukas or chapathis...:) Enjoy

Yummy Homemade Donuts

This yummy sugar dipped ring just takes my heart away, everytime I sink my teeth into it. I love donuts. Yeah I can eat donuts anytime well its the different story that my hubby never allows me to go over indulging on them hehhe. He loves me so much that he watches how many I eat at a time hehhee:P
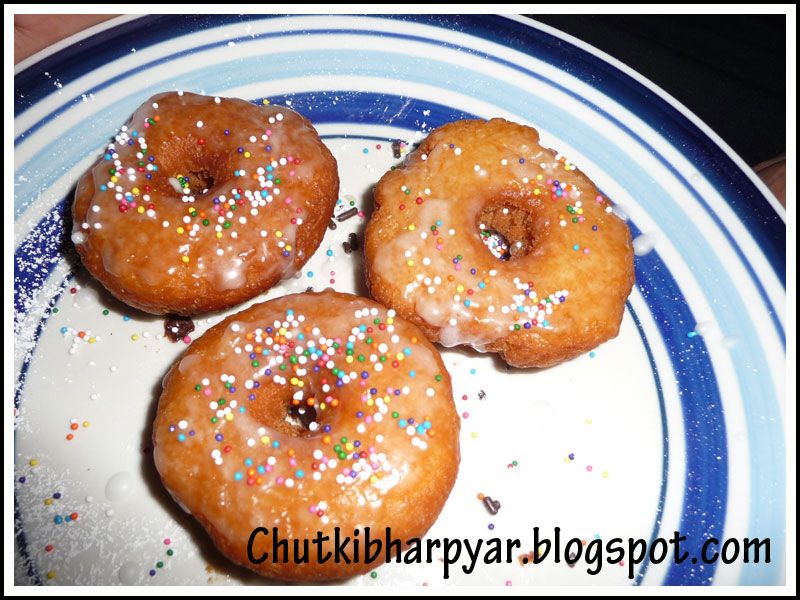
I had the ultimate Krispy kreme donuts when I went to Detroit in Jan.KK donuts are just awesome. It simply melts in ur mouth. And its such a treat watching the KK belt, where u can see the donuts being fried and then tossed and coated with the smooth sugar glaze.... and then the attendent picks up one hot donut and hands it over to u for tasting..... ummmmm...:P wtelse can u ask for?? right? Anyways I never thought I cud ever make these at home, until I found Rashmi's recipe. I saw these donut pictures in her album and when I saw the recipe... I wanted to try it as soon as possible because it is soooooooooooo easy to make. Here is the actual recipe. I will post the recipe again. So to make these delicious donuts you need....


Ingredients for donuts:

Pancake mix (I used buttermilk complete from Aunt Jemina) - 2 cup
Milk - 1/2 tbsp
oil - 1 tsp
water - 1/2 tbsp
Oil for deep frying

Fo glaze :

Confectioner's sugar - 1 cup
hot water - 11/2 tbsp
hershey's Chocolate syrup

For decoration:

Sprinkle - multi colour and chocolate


Method :

Heat the oil in a deep bottom pan (kadhai) at medium high.

Mix the milk and water. Take the pancake mix in a bowl and add the milk and water mixture to it slowly while lightly mixing with hand.add the oil.See that u dont knead it too hard. Use light hands....no pressure. See that u dont make it very watery...the dough shud be like the roti dough.once the dough comes into a nice ball keep it aside for 4-5 minutes.

In the meantime prepare the sugar glaze by mixing water in the confectioner's sugar.Be careful while adding water so that u dont make it very watery. the galze shud be smooth and a bit thick...:)

Now take small balls of the dough and press it using ur palm. Make into small circle using ur hand. Now using a bottle cap ( I used an oil bottle cap) and cut out the hole in the centre. Make few donuts this way and fry them out.

Arrange the donuts in a plate and pour or brush the sugar glaze of top of the donuts. See that the sugar glaze goes till the bottom of the donuts...to make it evenly sweet..:). To decorate put the sprinkle on the donuts before the sugar glaze dries out. For a chocolate glaze, take the choclate syrup in a small plate and dip one side of the donut in the syrup and then add sprinkle to it. Your donuts r ready to be served...:)


Your yummy donuts are ready.....enjoy them hot for the delicious flavour...:D