WELCOME!


Powered by IP2Location.com

Monday, March 23, 2009

New Mehendi Designs

Do not Copy these designs... they r Copyright Protected.

My recent mehendi designs...now copyright protected. I recently had an incident wherein someone copied my designs and even showed and attitude about it. Well I cant avoid these things.. But atleast I can put a copyright watermark on it... right?? So here r few of my recent designs...:D Do leave a comment on them.

Thats the mehendi design i did during my trip to india. its my bhabhi's hand...:)


Thats for a dearest friend krithika's baby shower...:) the colour turned out soooo good..:). She recently gave birth to a sweet little baby girl..:D

Another view of krithika's hand...:)


Another one here....:D Nice isnt it??


Bhabhi's hand... back side...:)


My mom- in -laws hand..... she was so busy when i was doing this... hehhe. Glad she agreed for this small design atleast hehe:)


Trial with a loose mehendi... I had this cone at home which was very very thick and hard...was not able to make designs out of it... so i took out all the contents and put it in a cup and added a spoon of fine sugar( sugar they say has the ability to dilute the mehendi a bit and also add elasticity to the mehendi.... which way it doesnt powder out when dried....) well well some experiments...:P So when I added and left it for 30 minutes, the mehendi became very very loose and watery... hehhe hence my mehendi is glitering and almost flowing...:P
I just sat and scribbled some design that came into my mind and to my astonishment it turned out into a good design.... hmm wish i had a very good cone.. instead of this watery one..:P

My hand..... i put this design while in india.. its my own creation (my design)...:D Isnt it good..??:P

Some old designs now...Which I did earlier...:D
My new Mehendi designs I made yesterday. do comment. I even made the mehendi paste and cone at home.The paste became a bit dry but otherwise the colour cam out good. will take the picture of the mehendi stained hands. I kept it just for 1/2 hr. due to work at home.


A close up of the design...:)
Design on the back of the palm..... design in progress...


Do leave ur comments on my new designs. Please dont copy or Use these design without permission. If u want something... Ask for it.

Thursday, March 12, 2009

Easy Black Forest Cake

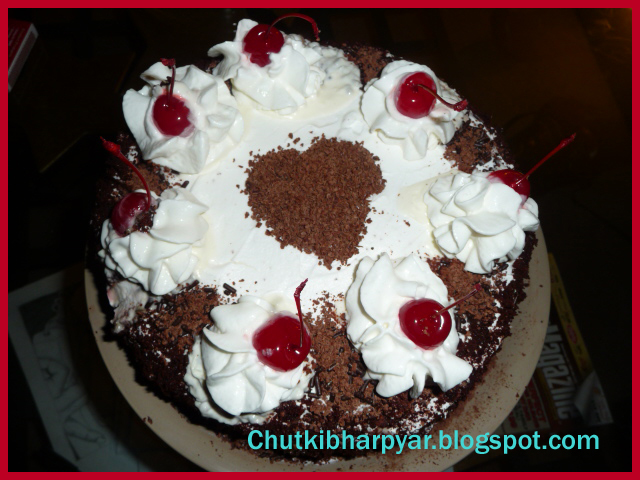
Yum yum Black Forest cake. This cake has always been my favourite. I remember eating in monginis...with every extra Rs. 10 that we used to save. This pastry has always been my fav and the same with my hubby. So what better ocassion to make this than for our anniversary..:D I made this one for our 2nd wedding anniversary which was on 8th of december (sorry for posting it sooo late..:d)

I wanted to make it special and had no idea what shud I make. So I took the help of my dessert Queen friend Jeana and ask her to help me out with any of her good recipes. She told me about this one as said that it will be easy too as its made using a mix. The minute I saw the cake I knew I had to try it out. And here I am with the outcome. The beautiful, soft and creamy Black forest cake. Yummm!

You can find Jeana's recipe here. I will anyways write down the recipe and procedure again here.

For making this awesomely easy and tasty cake u need....


Ingredients:

Devil's food cake mix (any brand) - 1 pack
Below ingredients as given on the cake mix...
Eggs - 3 (I used 2 and came out good)
vegetable oil - as on package
Water - as on package

Lite cherry pie filling - 1 can (I used normal cherry pie filling)
Whipped cream - 1 tub (u can find this in the frozen section)
Maraschino Cherries with stem - 7-8
Grated Chocolate -for garnishing


Method :

Preheat the oven to the required temperature to bake the cake. See the temperature Instructions on the cake pack. Mix the ingredients of the cake as given on the package.

Grease a cake pan well (or u can even line in with a parchment sheet.) The Divided the cake batter into two 8' round pans and baked it for 50 minutes. The time may vary from oven to oven so do check ur cake by inserting a toothpick into the centre of the cake. If it comes out clean, ur cake is cooked well. You can even bake the whole cake in one deep 8' pan and then cut it into 2 layers.

Let the cake cool well on a cake rack. Cut the done and the hard sides of the cake and keep it aside.

Open the can of the cherry pie filling and reserve the juice. Sprinkle some cherry reserve juice on both the cakes. Leave it aside for 15 minutes or so. See that u dont make the cake too soggy.

On a cake board, or cake circles (u can get these in Micheals..:D) take one layer of the cake and pipe a dam of whipped cream around the rim of the cake layer so that the filling does on escape to the outer surface.Now scoop out and spread the cherry pie filling in the centre of the cream dam. Spread well and evenly.

Now, place the second cake layer on top of the cream filling. Frost the sides and top of the cake with the whipped cream. Smooth it as fine and smooth as possible. Now remeber the cake dome and side scrapping of the cake...? Crumble that with ur hand and then stick them to the sides of the cake. Try to stick them to the sides as evenly as possible.

Now comes decorating the cake... You can do it anyways u want... play with the placement of the cream swirls and the cherries. I followed what Jeana had done with her cake. Playing safe..:P
Using the whipped cream in piping bags, make 7 swirls at equal intervals on the top of the cake.
Top the swirls with the stemed cherry, one on each swirl. Decorate the centre with grated chocolate.

*****One small tip. Dont use the canned cream or reddiwhip to make the swirls. They dont last long. I made the swirls on this cake, placed the cherries on top and went for a romantic dinner with hubby and when I came back I cudnt see the swirl anymore just cherry which where actually slipping down the cake. Hmmm thought it was a disaster but somehow managed to tidy it up a bit and get it back. So avoid the canned ones...used whipped cream from the tub.. they stay good..:) Enjoy making this Cake as much as I did..:D


This was our lovely anniversary evening cake. I had fun making this as it didnt eat up my time...:) I am glad i made this sweettreat and I am sure I will be making it again too.:)

Tuesday, March 10, 2009

Kothu Barota / Parotha

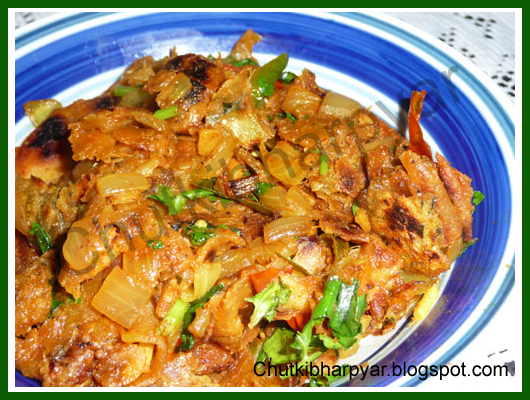
Kottu Barota / Parotha comes from Tamil Nadu, guess from a city called Trichy or Tiruchirapalli. Some say it has originated from Kanyakumari district of Tamil Nadu. I dunno much about its history and origin except that whoever invented this dish was a genuis. The literal translation of "kottu parotha" is Minced Paratha (indian flatbread) and that is how it is made, by shredding the parathas and adding it to some stir fried veggies...yummm! And for other who r wondering what is "Barota or Parotha..." thats how u call parathas down in chennai... heheh:P

I am a vegetarian hence showing the vegetarian version, but normally its made using egg and is called "Mutta kotthu paratha ". Muttai means egg in "Tamil". U can also add shredded chicken to this dish I guess. Just keep experimenting.

Anyways its very very easy and simple to make and I am sure you will love this one. My hubby had never eaten this before and when he did he simply fell in love with this.

I used to have something similar when I was in school. My friend used to get this in dabba....Her mom used to make it with leftover phulkas(rotis) dont remember what she used to call it in marathi...hmmm old days r so good isn't it?

Anyways here goes the recipe and the list of ingredients.


Ingredients:

Store bought frozen parathas : 3 (I used malabar paratha)

Onion : 1 finely chopped

Tomato : 2 medium finely chopped

Green chillies : 2 slit lenghtwise

Ginger : 1 inch minced

Cumin seeds (Jeera) : 1 tsp

Salt to taste

Dhania-Jeera powder : 1 tsp

Garam Masala powder : 1 tsp

Red chilli powder (optional)

Oil : 2 tsp

Fresh coriander leaves : 1 whole bunch finely chopped

Method :

Thaw the parathas slightly and roast them on the tava accroding to the paskage instruction. Shred them into small pieces with ur hand or using a knife and keep it aside.

In a kadhai take some oil and add the Jeera. Let it crackle. Now add the chopped ginger and mix well. Toss in the onions and saute till transparent and follow with the chopped tomatoes and cook till nice and tender. Add the garam masala, red chilli powder and dhania - jeera powder.Let hte masalas cook well. Once the water evaporates from the tomato onion mix, add the salt and toss in the shreded parathas and mix well on medium high heat. turn off the gas and leave it for 2 minutes. Now garnish with coriander leaves and lemon juice. Mix well and serve hot.:)

I am sure u all will enjoy this. My hubby topped it with some fresh chopped onions and some sev. It tasted delicious...:)

Hope u enjoy this traditional south indian delicacy as much we did.... Yumm is the word for this one !

Monday, March 9, 2009

Vegetable Chinese Fried Rice


I love chinese.... Specially the indo chinese we used to get in the thelas of india. Yumm yummm! How I miss eating all that... Now, I dunno after staying in US what happened to my Immune system.... I ate chinese in india this time and fell sick... hmm. Anyways... those were the days... we used to eat the yummy indo chinese in the road side shops near Vt station... it used to be awesome...:) Anyways here goes the recipe...:)

Ingredients :

Basmati rice : 2 cup (cooked and cooled)

Ginger - 2 tsp finely chopped

Garlic - 2 tsp finely chopped

Carrot - 1 thinly sliced in juliens

Cabbage - 2 cup thinly shredded

Onion - 1 thinly sliced

Bean sprouts (optional) - 1 cup

Soya sauce - 3tbsp

Vinegar - 2 tsp

Sesame oil

Tomato sauce - 1/2 tbsp

Green chilli sauce - 1 tbsp

Salt and pepper to taste

Green chillies - 2 cut lengthwise

french style beans - 1 cup

Spring onions - 2 sprigs finely chopped

Method :

Cook the Basmati rice on a stove top with lots of water and then drain the water once done. Pour cold water over the rice to stop it from cooking. The rice shouldnt become mushy or overcooked. each grains of the rice should be seperate.

Heat some sesame oil in a wok / kadhai. Heat the oil till its nicely heated.Stir fry the garlic and ginger. Then add the vegetables (except the sppring onions and 1/2 of the bean sprouts) and stir fry well for 3-4 minutes. Dont overcook the vegetables. The vegetable should cook and yet be crisp.

Mix the salt and pepper to taste. Add the soya sauce, vinegar and tomato ketchup and mix well. cook for 2- 3 minutes.

Now add the rice and mix well. Cook for 3-4 minutes on high medium flame. Remove the rice onto a serving bowl and garnish it with Bean sprouts and spring onions.

Enjoy hot with some schezuan sauce or some delicious machurian. Have fun making it..:)

Khaman Dhokla


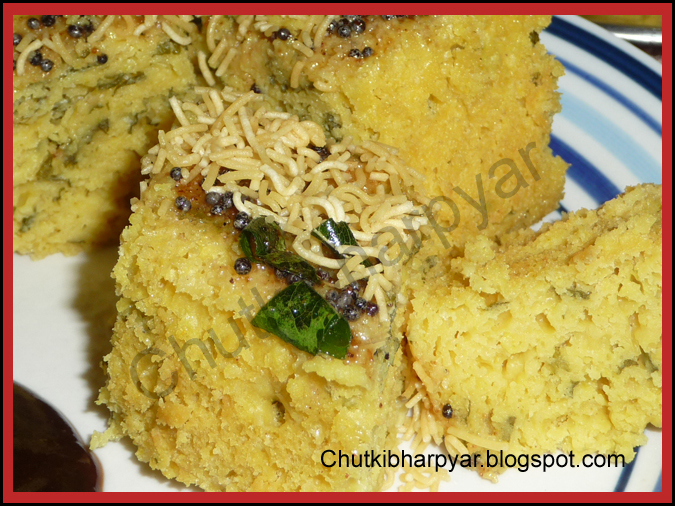
So soft and so spongy. Isnt it? I remember my dad used to get them for us.. almost all weekend...from the famous haldiram's when we were in nagpur... that is when I started liking this comfort snack. They used to serve this with fried and salted green chillies.... yumm believe me my mouth is watering now..:P I am drooling hehehe:P

Anyways there also another way of serving this delicious dhokla. I had this at a friends place when I was doing my degree. You need to crumple the dhoklas (once cold ) with ur hands . Be gently when ur doing this. Dont mash the dhokla..:) put the crumples on ur serving plate. Drizzle tamarind chutney and garnish with sev and coriander leaves. Nice isnt it? Adding onions will add to the taste here...:P

Anyways.. going back to the recipe..


Ingredients:

Gram flour (Besan) : 1 cup

Yoghurt : 1 cup

Semolina : 2 tbsp

Warm water : 1/4 cup

Green chillies : 1 finely chopped

Fresh corinader leaves : 3 tbsp

Salt to taste

Turmeric powder : 1 tsp

Lemon juice : 3 tsp

Eno's fruit salt : 1 tsp


For tadka (tempering)

Oil : 1 tbsp

Mustard seeds : 1 tsp

Asafoetida (hing) - 1 tsp

Sesame seeds (optional) - 1/2 tsp

Green chillies - 1 chopped


Method :

In a bowl take the gram flour and semolina. Put in the yoghurt, salt, cilantro, lemon juice and green chillies into the flour and mix well to form a smooth batter. Add water if u feel the batter is too thick. See that the batter is nice and smooth and no lumps r formed. The batter should be of a pouring consistency.

Keep the batter aside and let it rest for an hour.

Now in a deep bottomed saucepan or pressure cooker... take some water and heat it at medium high. Place the cake rake into it. You can do this in a cooker too.

After the water starts to boil, turn down the heat to medium.

Add Eno to the batter and mix well. the batter will foam up. Now, quickly pour the batter into the greased cake pan.

Place the cake pan inside the saucepan/cooker on the cake rack. Cover the saucepan /cooker and steam for 10- 15 minutes on medium heat.

Test the dhokla with a knife. If the knife comes out clean, your dhokla is done. Off the heat and remove the cake pan out. let it cool to room temperature. Cut it into pieces.

In another vessel heat some oil and put all the ingredients of the tempering into the oil once the oil is hot enough. Pour the seasoning over the dhoklas and serve along with chutney.

I garnished it with some coriander leaves and sev too...Tasted good.:)


(Now some words about how to steam this dhokla. There are two ways to do it.

- One u can steam it easily in a pressure cooker, using a greased steel round pan (cake pan), pour the batter in it and steam for 10-15 minutes...or

- by steaming it in a deep bottomed vessel filling it with water (water level just enough to touch the base of the greased cake pan. Remember to keep a cake rack below the cake pan so that u dont burn the base of the dhoklas..) and covering with a lid. U can grease a cake pan, pour the batter and place it in this boiling water to steam. )


Your yum and fluffy dhokla is ready. Serve it with some tamarind or green chutney. Or crumble it and serve like an upma..:) Enjoy it. !


Thursday, March 5, 2009

Hot 'n' Sour peanut noodles.


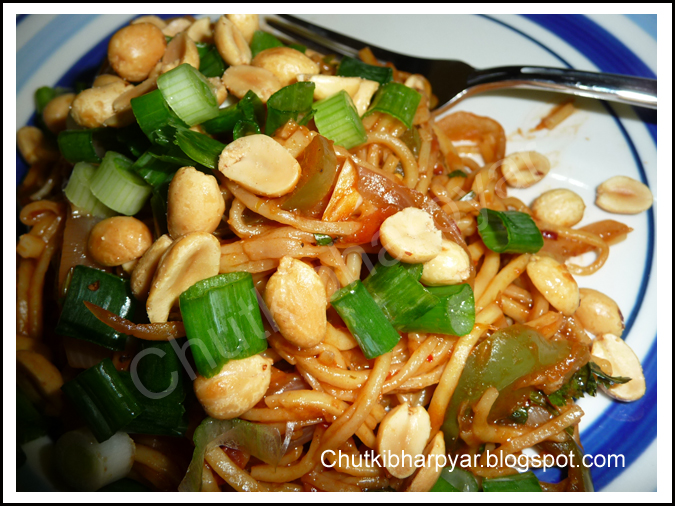
Something hot and Something sour...I wanted to try something new with noodles and also peanuts...as my hubby loves peanuts in noodles and pasta (the thai peanut liguini pasta is his favourite...) as I didnt have spices for a thai pasta... thought will do a fusion between Indo-chinese and thai...:) Cool isnt it?

This also reminds me of the Street Indo-chinese that we used to get in india...:) Miss thems ooo badly... anyways here goes this lip smacking yumm recipe..:D


Ingredients:

Hakka noodles or Chowmein noodle (egg noodles) - 1 pack
Rice wine vinegar - 3/4 cup

Lite soya sauce - 1/3 cup

Honey or sugar - 1/3 cup ( i dont like the smell of honey so used sugar...u can use honey thats wt the actual recipe calls for.)

Fresh chopped Ginger - 3 tablespoon

Chopped garlic - 3 pods

Asian Chilli garlic sauce -1 tbsp

Dark Sesame oil - 2 Tbsp

Chopped green onions - 1/2 bunch

Onion - 1/2 cup ( sliced in big pieces))

Green bell pepper - 1/2 cup ( sliced in big pieces)
Baby corn - 1 can (optional)

Roasted and salted peanuts - 1 cup

Salt & pepper to taste


Method :
Whisk together Rice white vinegar, Lite Soya Sauce,Sugar, Asian Chilli garlic sauce & Dark sesame oil in a medium bowl; set aside


Cook the noodles seperately according to the package instruction and Keep aside.


In a wok add some sesame oil and the chopped garlic. Stir for some time. Add the onions, green bell pepper and the baby corn. Stir fry in a medium high flame for 10 minutes until the veggies cook well but yet is crisp. Add salt and pepper.

Now add the cooked noodles...:) And stir fry well till the veggies r cooked well. Add the vinegar & sauce mixture and stir fry.Toss well to combine.


Garnish with Green onions, peanuts and Tossed sesame seeds (optional)


Serve hot or cold. Tastes awesome either way. You dont need any sides with this. Enjoy!

Spinach Artichoke Dip


The most sinful dip I have ever tasted. I just love it.. the melted cheese with the taste of the artichoke and nicely baked spinach..... yummmm! I first ate this in Maggianos Resaturant and just fell in love with it. My hubby doesnt allow me to order this often as he says its very cheesy and not good for health in excess...:) He is my personal dietician hehehe..:P

Anyways I just got few artichokes as I wanted to experiment with fresh food. So what better than making a Spinach artichoke dip right?? So here goes the recipe..:D


Ingredients:

Artichoke Hearts - Fresh (2) or u can even use Canned artichoke hearts

Spinach - 2 cups

Shreded Mozarella cheese & Parmesan cheese - 1/4 cup each

Cream Cheese - 2 cups

Yoghurt - 1/4 cup

Garlic - 3 pods cleans and minced

Fresh or dried basil - 1/2 tsp

Salt and pepper to taste

Garlic salt - 1/2 tsp (optional)


Method :

Preheat the oven to 350 degrees F. Lightly grease a small baking dish and place inside the oven.

Chop the artichoke heart and spinach well. I used frozen spinach which I thawed well before using

In a medium bowl mix the Yoghurt, basil, cream chese, garlic, salt, 1/2 of the Mozarella cheese and parmesan cheese,pepper and garlic salt. Slowly now stir in the Spinach and the chopped artichoke hearts. Mix well.

Now tarnsfer this mixture into the preheated baking dish and top with the leftover Mozzarella cheese and bake for 25 minutes until its bubbly and lightly brown on top.

Variation** I added some chopped red pepper to this recipe.. just for the colour..:)


Serve hot with ur favourite nacho chips or Pita bread..:) Enjoy!


Garbanzo salad / Sundal


This reminds me of Navarathri days in India. As a kid I used to go and see all the gollus(aarangement of dolls)...sing songs and come back with a packet of these lovely little darlings. Yummmm! How I used to love this as a kid, well I love it even now...:D This is like a salad...and is called as Sundal in Tamil....:)

Okie now we come to the recipe

Ingredients :

Garbanzo Beans /Kabuli chana - 1 Big Can
(if ur using dried ones...soak it overnight and then steam it in the cooker a bit)

Grated coconut - 3/4 cup

Mustard seeds - 2 tsp

Curry leaves - 2 twigs

Asafoetida - 2 pinch

Salt to taste

Oil - 1 tbsp

Green chillies - 2 slit lenghtwise

For garnish - Coriander leaves and grated Coconut


Method : Empty the can of garbanzo in a microwave safe bowl and wash the beans well in running water. Now Steam the beans in a microwave for 2 mins on high.

(I used the can hence this step.. if ur using dried beans and soaking it, Just steam it in a cooker and ur all set to make the sundal)

In a deep bottom pan take some oil and put mustard seeds and let it splutter. Then add green chillies and curry leaves. Add asafoetida and leave it on for few minutes. Add the coconut and stir fry for 5 minutes, until the coconut roasts a bit and gives out a nice aroma. Now add the Garbanzo beans and mix well. See that u do this gently u dont want to mash the Garbanzos...:) Add salt and mix well. Let the Garbanzo roast for sometime. Garnish with some more coconut and coriander leaves.


Serve hot with a bowl. Can be enjoyed as an evening snack!