The new mehendi design...:) do comment plz :)
Friday, February 4, 2011
Doodh Peda
Deliciouso ! I love milk sweets. Anything made out of milk (except payasams) I simply love them especially the bengali sweets. Somehow I can't stop myself from have seconds n thirds and fourths.... well u know what i mean ;)
I saw this Microwave doosh peda recipe in spme blog.. I dont remember where... and bookmarked it (I lost the link when I formatted my pc ). It was the most simple recipe and the pedas where awesome... as if I entered a sweet shop in India..:) yumm! I did find a scribble on my recipe book for the peda....which i had written for a friend. (thank godd!!!! :P) So happy to see the recipe... I decided to try these again...:) its a fool proof recipe. I will share the original recipe when I get it through my innumerous seraches. I do remember the picture for the original peda.... but forgot the link... hmm so stupid right?
Anyways this what I had scribbled on my notebook...:)
Ingredients :
Low fat Milk powder - 1 3/4 cups
Condensed Milk - 1 can (14 oz)
Butter / Ghee (room temperature) - 4tbsp (1/2 stick)
Cardamom powder - 1/4 tsp
Crushed pistachio - for garnishing
Saffron - few strands (optional - i didn't use it )
Method :
1) In a microwave safe deep bowl add the butter, condensed milk, milk powder and cardamom powder. Mix well.
2) Microwave for 3-4 minutes. Remember all microwaves differ so keep checking. Remove and microwave the mixture every 1 minute.
3) Take a small portion and try to roll it between ur fingers. If it retains the shape and doesn't stick, that means its done.
4) When it cools, take small lemon size pieces and roll into a ball. Gently press in the centre forming into a disc.Put some coarse pitachio powder in the centre of the peda and press well.
your lovely pedas r ready to be enjoyed. It was yumm!
Wednesday, February 2, 2011
Tandoori Veggies
Well as a lovely friend said....looks like I am on a streak...:) I am posting almost everyday from the past 4 days....which beleive me is a lot according to my earlier posting schedule :P. Hope I keep the good work on.
Anyways coming to the recipe....its a vegetarian tandoori dish using tofu and other vegetables. Many friends who saw this pic first thought I have become a non vegetarian and started cooking mutton or chicken....hmmm maybe they thought so because of the colour. But I guarantee this is pure pure vegetarian dish :P
It easy to make and goes good as an evening snack or serve it on a platter of pulav n raita..:)
Ingedients :
Firm Tofu - 1 cup (chopped in big cubes)
Green bell pepper - 1 cup (chopped in big chunks)
Cherry tomato - 1 small box
Button Mushrooms - 1 small box
Chinese eggplant - 1 (chopped in thick slices)
Zuchini - 1 big (chopped in thick slices)
Onion - 1 medium (cut in big chunks keeping the layers intact)
Garlic - 3 cloves (minced)
(you can use other veggies like squash, potato etc)
For the Marinade :
Salt to taste
Hung curd - 1 cup
Tandoori Masala - 2 tsp
Chaat masala - 1 tsp
Kitchen king masala - 1/2 tsp
Pepper - 1/2 tsp
Ginger paste - 1 tsp
Coriander cumin powder - 2 tsp
Red chilli powder - 1 tsp
Lemon juice - 2 tsp
Olive oil - 1/2 tbsp
Red food color - 2 pinches (optional)
Method :
1) Preheat the oven at 350 F.Mix all the marinade ingredients in a bowl (except oil). Beat it well into a smooth paste. Do a taste check and adjust the seasoning.. the marinade should be nice n thick...not runny. see that ur hung curd has no water in it at all..:)
2) Put all ur chopped vegetables in a big bowl. Add the marinade to this and mix gently. Dont mush or break the vegetables. U can use ur hand to toss it gently.....so that the marinate coats all the vegetables well.I do that :) Cover and leave it here for atleast an hour.
3) After an hour thread in the vegetables in any order u want into a wooden skewer. Wet the skewers before threading the veggies so that they dont burn in the heat from the oven. U can even skip the sweker and actually roast these of stove top using a hot hot pan / tava :)
4) Anyways once u have threaded the veggies place them in the preheated oven for 15 minutes. keep turning it in between and keep and eye on the oven all the time. U dont want ur veggies to be burnt...:). Additionally u can run the oven at "broil" for 2 mins maybe to give it a charged look...:)
Ur Tandoori veggies r ready. Remove it from the skewers and serve it along with some yogurt dip or simply serve it on ur vegetable pulav. Enjoy !
Tuesday, February 1, 2011
Eggless Triple Chocolate Cake
It looks yummy right? It tasted yummier...trust me. I made this cake for this new year of 2011 with some help from "R" who actually offered to help me out with baking this cake. He was surprised on how simple it is to bake...."provided you follow the measurements" :) This is very simple cake and it is eggless. I got the Idea of making this from Anu's blog Mriganayani .
Her chocoholics cake was awesome n looked so tempting... that I had to try it out :)
I call it Triple chocolate coz its a dark chocolate cake with chocolate icing and dark chocolate ganache. Three delicious layers of chocolate...:) I made few changes to the recipe... but the idea is fully from Anu's blog.
Ingredients for the cake :
yields one 8-9" cake
All purpose flour - 1 and 1/2 cup
Sugar - 3/4 cup
Salt - 1/2 tsp
Baking soda - 1 tsp
Unsweetened Cocoa Powder - 1/2 cup
Vanilla extract /essence - 1 1/2 tsp
Canola oil - 1/3 cup
White Distilled Vinegar - 1 tbsp
Cold water - 1 cup
Ingredients for Chocolate Icing :
( to cover two 9" cake with the filling of icing in between)
Butter - 1cup (2 stick)
Unsweetened Cocoa - 1 cup
Powdered Sugar - 1 1/4 cup
Milk - 2/3 cup
Vanilla extract - 1 tsp
Ingredients for the Chocolate Ganache :
Dark Chocolate chips : 1 cup
Whipping cream - 3/4 cup
Corn Syrup - 1 tsp (optional)
Method :
1) Preheat the oven to 350 F. Firstly bake the cake. From the ingredients given for the chocolate cake mix all the dry ingredients (except salt n sugar) and sift it atleast two times. 2) In another bowl wisk together all the wet ingredients with salt and sugar. Wisk well to dissolve the sugar and salt in the vinegar, oil n water mixture. 3) Slowly keep adding the dry mixture into the wet ones. Mixing with a hand blender so that the batter becomes aereated and has no lumps in it. 4) Once the batter is smooth, pour it into two 8-9" greased cake pan and bake in the oven for 25 to 30 minutes. Keep checking inbetween.5) Mine were done in 22 minutes, so please keep checking and do a toothpick test before removing the cake out of the oven. 6) Take it out and invert it on a cooling rack for cooling down. Once cooled wrap it in a plastic wrap and keep it in the freezer or fridge for cooling. It helps best if the cake is cool before u start icing.
7) For the icing, beat room temperature butter in a deep bowl. Add powdered sugar little by little and beat until the icing is fluffy n smooth. Add cocoa powder, vanilla essence and beat again until smooth n creamy. 8) If u want to do a crumb coating ur icing should be of a spreadable consistency. So add milk to the icing little by little to make is thinner and easily spreadable. 9) If u want to use ur icing for decorating keep the icing thick. Piping designs hold better when the icing is thick. Keep icing aside.
10) Prepare the ganache by boiling cream in a pot. 11) Take the chocolate chips in a bowl and when the cream is in a rolling boil pour it on the chocolate chips. 12) Let it stay for 2 minutes and then stir well using a wisk until the chocolate blend in with the cream. Let it form a smooth creamy chocolate sauce. Add corn syrup to the sauce to add that shine to the chocolate sauce. Keep aside in room temperature or in a warm place. Remember it should be cool or room temperature when ur r pouring it on the cake.
Assembly of the cake :
1) Keep on cake on the cut cardboard on which u will serve ur cake. Place small plastic sheet/ parchement or foil sheets below the cake and over the board... so that the icing and ganache when put on the cake dont spoil ur cake board.Cut the rough or hard edges of the cakes well and remove the crumbs if any. 2) Put about a big spoonful of icing on one cake (this form the lower layer of ur 2 layered cake). Spread it on the cake to form a thick layer of the icing. 3) Place the second cake on it and spread another big spoonful of icing on it. Cover even the sides of the cake in a thin layer of icing. This is called the crumb coat.
4) Keep the iced cake in the freezer for 30 minutes or so... for the crumb coating to become hard. 5) Remove and spread another thick layer of the icing on the top and sides of the cake. Smooth it well. 6) Now u can either decorate it with the remaining icing and piping bags...or use the ganache as i did...:) This cake will take awesome even without the ganache..:)
7) Keep the cake on a clean serving. Spread some plastic sheets to collect the falling ganache. 8) Now pour the cooled ganache on the cake... let it overflow and drip from the edge. 8)I used a serving spoon and kinda splashed it on the sides to cover the cake completely. Let this cake stay in the until the ganache solidifies a bit. Remove the plastic pieces kept for protection... Ur cake is ready to be served n enjoyed..:)
Hope ur enjoyed this recipe...:) Do give me ur valuable opinion on the same. Love u guys.. and have a great year ahead :)
Vegetable Sheperd's pie
Vegetable Sheperd's pie. This is something i tried long ago... took pics and never bothered to post. This savoury pie is very simple to make and filling..:) A nice way to include all the veggies u family normally tries to avoid..:) Kids love this pie too. U can either bake it in a big casserole or make individual portions of the pie in Ramekins..:) A Sheperd's pie normally is a supposed to be "no extravagant dinner". It was something the sheperd's wife used to make with leftovers available and vegetables. U can even add chicken or any other meat to this recipe. Mine is a vegetarian version. I dunno much about the origin of this recipe but know that it is something I am gonna make often..:)
Ingredients :
Filling :
Fresh or frozen Vegetables (blanched,steamed or microwaved except mushrooms) - 3 cups (I used mushrooms, cauliflower, green beans, carrots, celery, corn, spinach, peas & Bell peppers)
Onion minced - 1 cup
Tomato finely chopped - 1 cup
Cooked garbanzo beans - 1 small can
Cilantro or parsley - few sprigs
Italian seasoning (oregano will do too ) - 2tbsp
Salt to taste
Olive oil - 2 tbsp
Chopped Garlic - 4 cloves
Vegetable stock or water - 1 cup
Red chilli powder or hot sauce - 2 tsp
Black pepper - 1 tsp
Turmeric powder - 1 tsp
Cover :
Russet potato - 3 large (boiled and mashed)
Cream or heavy cream - 1/4 cup
salt to taste
Black pepper - 1 tsp
minced garlic - 1 clove
Method :
1) Heat oil in a deep bottom pan and add chopped garlic, onion and stir fry for few minutes. 2) Once the onion is slightly browned add the chopped tomato and saute well for few minutes. 3) Add all the steamed vegetables and garbanzo to the saute pan and mix well. 4) Add salt, pepper, red chilli powder, italian seasoning, mushroom and parsley and cook till the vegetables r coated with the spices and completely cooked. See that its not mushy. 5) Check the seasoning and add more if needed..:)
6) Preheat the oven to 350 F and Prepare the covering by adding cream , salt, garlic and pepper to the mashed potato. Mix well seeing that there are no lumps. 7) Now for the assembly, put the vegetable filling in a oven proof greased pie pan. 8) Level the vegetable filling on the pan and spread little bit of the potato cover mixture on the filling evenly. 9) Put rest of the potato mixture in an icing bag with a large star tip. Pipe out potato stars on the evened out potato. Cover the whole area. 10) Place the pie pan in a preheated oven and bake until bubbly for about 30 minutes. I even broiled it for a minute or 2... for the nice golden brown crust...:). Enjoy this awesome and yummy Sheperd's pie to your heart's content. It is a very filling meal to be enjoyed in a winter evening.
Hope u liked this recipe. Do leave ur valuable comments..:)
Vietnamese Banh mi Chay and an Award. Yaaay !
This Sandwich is currently my favourite sandwich. I saw the recipe for this sandwich on Delhi belle's blog and I was instantly tempted to try this out.
I was curious about this particular bahn mi from the time i saw the food network show "The great food truck race" or something and they had this truck called "Nom Nom truck" which sold these sandwiches. It was a hot cake and that truck always came first in the truck to the do the most bussiness... hmm. I was very curious to see how a simple sandwich can beat grilled burger and cheese sandwich and other yummy trucks... hmm.. Btw they didn't win the tv show... they were runner ups though..:). The truck runs in LA and sells awesome veg n non-veg sandwiches. My recipe here is a Vegetarian one..:)
Anyway coming back to the recipe. When I saw this on Delhi belle's blog I had to try it immidiately. Me n R being sandwich lovers it wasnt difficult to convince him about having this for dinner..:)
Here is the original recipe. I will be anyways putting up the recipe again here.I didnt make much changes other than the tofu marinate as I didnt have lemongrass at hand.Also I want to thank Priya of Mharo rajasthan for motivating me to post this recipe with her awesome event "Bookmarked recipes - Every Tuesdays" . I am sending this recipe to that event..:)
Ingredients for sweet n sour pickle :Carrot julliened - 1 cup
Daikon radish (mooli) julliened - 1 cup
Vinegar - 1/4 cup
Sugar - 1 tbsp
Salt - 1 1/2 tsp
water - 2 cups
Marinated & flavoured tofu :
Firm tofu - 100 gms (8 slices 1 cm thick)
Mexican season powder (spicy fruit salt) - 2 tbsp (if u dont have this u can mix salt,sugar & red chilli powder )
Lemon juice - 2 tsp
Olive oil - 1 tsp
chopped Garlic / paste - 2 tsp
Soy sauce - 2 tsp (optional)
Black Pepper powder - 1 tsp
Other Ingredients :
French (wheat) Baguette - 1
Mayonaise / Veganaise*- 1 cup
Cilantro - 1 bunch
Shallot / red onion - 1/2 cup
Pickled Red chilli - 1/4 cup (u can make this at home like the sweet & sour pickle)
Ching's Mushroom sauce - 2 tbsp (optional)
*Veganaise is a vegan mayonaise...and its eggfree :)
Method :
The sweet n sour Pickle : 1) Mix the Julliened carrot and daikon in a boil. 2) In another bowl add the vinegar, salt, sugar and water and mix well until the sugar and salt dissolves well. 3) Pour the mixture on the daikon n carrot and mix well. 4) Keep this aside for an hour for the daikon n carrot to marinate.After using in the sandwich u can store the rest in a glass jar for later use. It stays good for atleast a month. 5) Do the same with the red chilli and store in a glass jar. Stays well atleast for a month.
Marinated and flavoured tofu : 1) Place the sliced tofu on a plate. 2) Sprinkle the fruit salt (or the red chilli, salt, sugar mix ), soy sauce, Lemon juice, olive oil, garlic and pepper on the tofu and rub it gently on the tofu. 3) See the the tofu doesnt break or get mashed up. 4) Allow it to marinate for an hour. 4) After an hour heat a griddle / tawa and roast the tofu on it. U can even bake it if u want...:)
***Cheater tip ;) - U dont actually need to marinate the tofu for 1 whole hour.:p. I just marinated it for just 15 minutes and it was perfect... but yeah 1 hour would be the best maybe :D
Assembly of the sandwich : 1) Cut the baguette in half and then slit it lengthwise. Toast it on a tawa for few minutes. The sandwich tastes crisper and nice when its warm :). 2) Spread a generous amount of the mayonaise on the bread. 3) Now drain a couple of spoonful of the sweet n sour pickle from its brine and add it to the sandwich. 4) Now, arrange some onion, the baked tofu and some sprigs of fresh cilantro on the sandwich. Keep the stems intact in the cilantro... it adds to the taste. 5) Add few drops of the mushoom sauce if u r using it.
Ur Yummy Vietnamese Banh Mi Chay sandwich is ready. Enjoy it and do leave me ur valuable comments n suggestions..:) Once again I thank Delhi Belle for this lovely recipe..:)
Now for some award time...:) I want to thank my new blogger friend Harika of Harika's blog for this awesome award. Thank u so much for tagging my blog as a Stylish blog :)

Isn't this pretty?? Yeah I know it is..:)
So to recieve this award I have some rules to follow. As we all know blogging is about knowing and sharing with others...so to accept this award there r certain criterias to be fulfilled.
1) Thank and link back to the blogger who awarded you with this award.
2) Share 7 things about you.
3) Award 15 recently discovered bloggers.
4) Contact the blogger and Inform them of the award.
So to start with I did the first part of thanking dear Harika. The second will be 7 things about me. Hmmm so here it goes..:)
- I love being a homemaker
- I love living in LA.
- I love crafting and also like to learn new art and craft forms..:). I love painting and cake decorating of them all..:)
- I am very very lazy....specially when it comes to blogging :D
- I am super talkative.
- I am super sensitive and very possesive :P
- I love India and want to someday go back and settle there..:)
Now comes the third part... Share it with 15 new bloggers... hmm. As I have not been very active for past few months/ years I think this is the most difficult job I have..:P
Anyways, here it goes
- Harika of Harika's kitchen ( just came to know her through this award..:)
- Sheela of Delectable-Victuals
- Mahima of Indian Vegetarian Kitchen
- Ranjani of Wake up and smell the Masala
- Annapoorna of Kadchhi ke Kamal
- Jyotsana of the Cook's Cottage
Wow these r some awesome blogs. I hope u all love these blogs as much I do...:) U all guys r doing a great job and I hope u love this award and accept it :)
Now the last part... well I will do that..:)
Love ya guys... see ya again later with a delicious post..:)
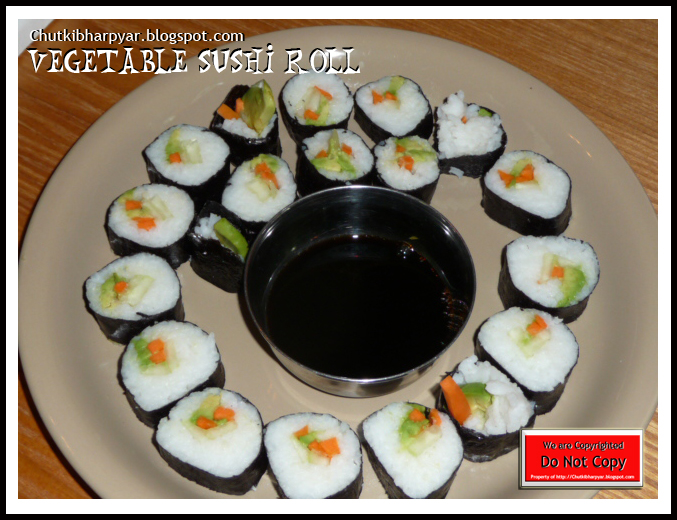
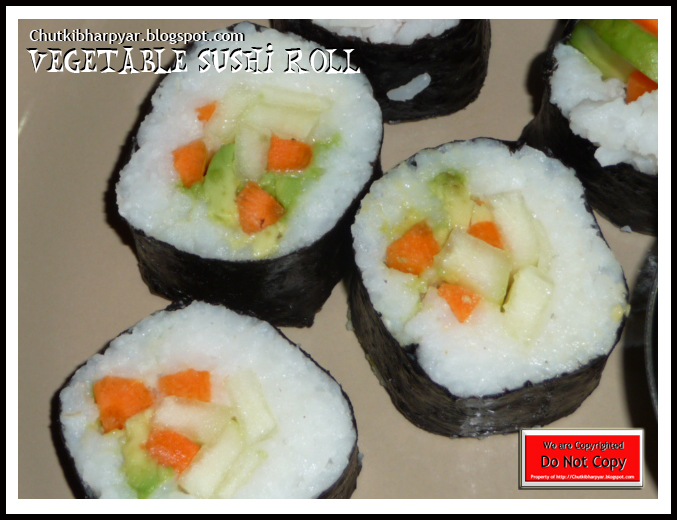
Wednesday, January 26, 2011
Vegetable American Chopsuey Yummy!
Super yummy...
I love Indo Chinese.As I mentioned earlier...Its our favourite. And American chopsuey is the most favourite of them all. And being here in US it is very difficult to find authentic Indo chinese. I love this restaurant in Artesia named Tangy Tomato. Its the best Indo chinese food I had after coming to US.And their American chopsuey is just yum!. So here I am trying to re create the Tangy Magic.
Ingredients for noodles:
Ramen noodles : 2 packets
For the sauce :
Garlic - 8 cloves minced
Tomato sauce / Ketchup - 1 cup
Soya sauce - 1 tsp
Red chilli powder - 1/2 tsp
Sugar - 1 1/2 tbsp
Oil - 1 tsp
Cornstarch / Cornflour - 1 tbsp
Salt to taste
For the Vegetables :
Onion - 1 sliced
Green Bell Pepper - 1 (sliced thin)
Cauliflower - 1/2 cup (chopped)
Carrots - 2 (sliced like matchsticks)
Green beans - 7 to 8 French cut
Soya suace - 1 tbsp
Crushed black pepper - 1/2 tsp
Oil - 1 tbsp
Salt to taste
Garnish :
Green Onions - 2 to 3 stalks
Method : Preheat the oven to 400 degree F.Break the 2 packets of noodles into small pieces and spread it on a cookie sheet. Spray some cooking oil on the noodles and place them inside the oven for 10 minutes. Take care not to burn the noodles.Keep moving the noodles every 3-4 minutes to avoid them from getting burnt.
For the sauce : Heat the oil in a pan and fry the garlic for a minute.Add the tomato sauce, red chilli powder, salt, soya sauce and sugar. Add 1 1/2 cups of water. Mix well and let the whole thing come to a boil.Mix the conflour with a tbsp of cold water and pour it in the sauce while stirring.Cook for another minute or so on low flame. The sauce should be thick and shiny now.keep aside.
For the vegatables :I use a wok for this process as I need to stirfry the veggies and not cook them completely. The veggies should be crunchy.First microwave or blanch the cauliflower /brocolli n and keep aside.See that u dont overcook it. Now in a wok take some oil and heat it up well. Add the onions and stirfry for a minute. Now add in the bell pepper, carrots, Green beans, cauliflower and stirfry again. The veggies should be cooked yet crunchy.Now add Salt, pepper and soya sauce. Toss well. Remove from heat.
Assembly : When ur ready to serve, In a dish place the toasted noodles. Top that with the veggies and the sauce. Garnish with chopped green onions and serve hot. This is yummy with fried rice, roti or even as it is..:)
Friday, January 21, 2011
Vegetable Sushi Rolls
Yum Yum! I am kind of in love with this japanese delicacy. Its so simple and tasty, yet so flavourful and very easy to make.And surprisingly DH "R" is also liking it. He is not a great fan of the seaweed or the smeel or Rice vinegar yet.. he gulped down a good amount of these little cuties (sushis).
Firstly I wanna appologise to all my dear readers for dissappearing from the blogosphere without any warning sign or post. There were so many things going on in my life that my little blog took the back seat in my journey through life. Now that things seem better I am back again to cook and blog about it. In this gap that I had.. I cooked many delicious recipes....some my own creation and some from fellow bloggers. I even took loads of snap... but just couldnt blog about it. Hopefully I can share with u all the lovely trial, failures and learning experience I had in my cooking world.
Anyways coming back to my sushi recipe. I have been wanting to try this (eating as well as making) from the time I saw this in a local food store about 3.5 yrs back, but never could as I wanst sure if they r pure vegetarian. Few years back I had seen this recipe of the vegetarian Sushi somewhere on youtube and was eager to try it out. It turned out pretty good and it was so easy to make as well..(provided u watch some youtube videos which will teach u how to roll the sushis well :) Like i did )
Source : http://www.youtube.com/watch?v=sgw0ODfWSOs
I made changes according to my taste.
Ingredients for rice:
Sushi rice : 1 cup
Sugar - 1 tbsp
Rice vine vinegar - 2 tbsp
Salt - 1/2 tsp
Method : Making this rice properly is the most important part of sushi making. Clean the rice well under cold tap water until water runs clear. Dont over rinse the rice.Spread the rice on the sieve or colander and leave it there for 30 mins until dry.
Place the rice and 1.5 cups of water in a rice cooker and cook well.
While the rice is cooking mix the vinegar, salt and sugar together and heat in the microwave for 25 sec or less. See that the mixture should boil or overflow.Set aside and alow to cool.
Once the rice is cooked. Remove it to a big bowl (wide one preferably) Spread the rice gently in the bowl. Dont throw ur rice cooker insert in the sink yet... its work is not over yet. Dont over mix or break the grain or even mash the rice. "Be gentle" is the key. Drizzle the dressing on te rice and slash the rice with the edge of ur laddle...(sort of like cutting the rice) mix well so that rice is coated well with the dressing and has a gloss.
put ur rice back into ur rice cooker and keep it on warm...until ur ready to roll ur sushi.
Ingredients for the sushi :
Roasted Nori sheets - 1 pack (mine had 10 sheets. If u don't get roasted one, u can always buy a regular one and then roast it on a griddle or on direct flame.)
Avacado - 1 sliced
cucumber - 1 small julliened*
carrot - 1 small julliened*
Wasabi - 2 tsp (or any other condiments - horseradish, pickled ginger etc)
1/4 cup Rice Vinegar
(* Julliened - cut into think long strips)
Tools :
" Bamboo sushi mat " this is an essetial tool for making sushi. This makes it easy to roll the sushi into those beautiful tight rolls.This is very inexpensive and easily available in asian store. I got mine from Ikea.
"Sushi rolling video" How much ever I explain to u how to roll it, it will be advisable to watch a sushi rolling video for better understanding.
Method :
Cut ur Vegetables in strips and keep this covered in the refrigerator.
Place ur sushi mat on a flat work surface. Your dining table will do. Place the nori sheet -shiny side down on the mat with the lines on the nori aligned with that on the bamboo mat.
Dip ur fingertip in the bowl of rice vinegar and then take around a handful of sushi rice and place it on the lower end of the nori sheet(closest to u). spread it evenly on the lower half of the nori sheet, leaving a margin of an inch on the top.Using ur hand. lightly press it to stick the rice to the nori. Dont put too much pressure.
Spread a small strip of wasabi to the centre of the rice. Place the veggies on the rice as shown in the video above. You can use any combination of veggies u like. Tofu, red pepper, tempeh, mushroom anything u like.
Now roll the Nori sheet to form a cylindrical roll (refer the video for the technique).
Cut the roll into slices and serve along with soy sauce or tamari sauce.