Babies......Babies.......Babies Galore!
Booties and rattle, diapers and swing.....
"Here comes the Baby!" comeon lets Sing!...
Wow I just now discovered I am a poet hehhe... wrote that rhyme in a click. Hmm anyways babies r something that inspire u to do so many things...write poetrys, be responsible and even change ur whole lifestyle.
One of my good friends here in Los Angeles is pregnant and I am so so happy for her. She is the first friend I made in US... and its a friendship to cherish. Seeing her I can understand that babies r such a big big commitment. All the things they had to prepare for the arrival of the little one. Buying the stroller, car seat, crib and then other small small stuff and then setting it up too. It was such a wonder to see them being so passionate about these things...:) I guess the babies make us grow up,........... grow up from our young happy go lucky age to become more resposible and mature...:). This somehow reminds me how we used to set up the whole house and the aasan for lord Ganesha's arrival...? this is somewhat the same isnt it?? hehehe...Now as the time is near and the wait is almost over... we all wish she has a safe and easy delivery. She has already passed her due date and the baby is expected anytime...:) Friends do pray for my lovely friends. It is their first baby. Pray she has a safe delivery and the baby and mom both be healthy..:)

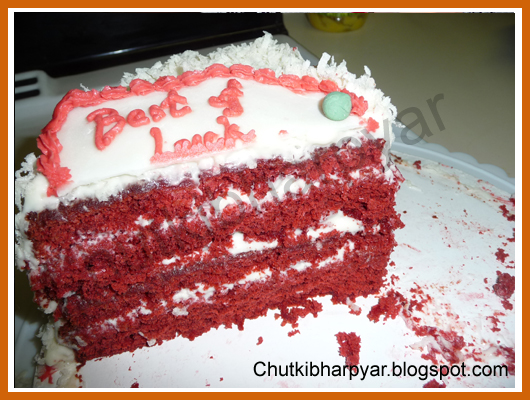
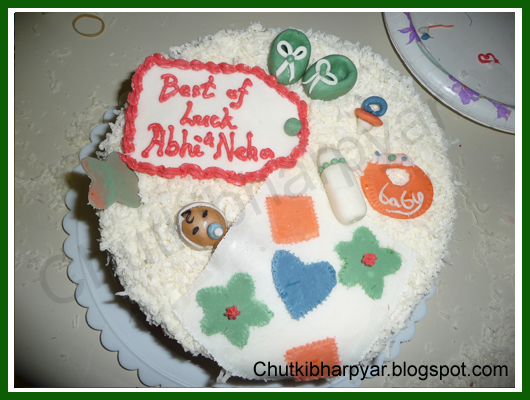
This cake is something I made for both of them. For wishing them luck..:) They had a baby shower at their place which was completely arranged by both of them with rituals and all.It was amazing and sooo beautiful arranged...:) As it was her baby shower and they both were the ones who were running around planning things.... I wanted to make something special for them and wish them luck for the arrival of the little on...
So here it is my first special cake from scratch...:) and this is also my almost first experience with icing and fondant...:) but I enjoyed it sooooo much and I am sure I will be doing it again. ofcourse my friend Hetal (Isha of
Isha's kitchen ) did help me making this one...and also making the fondant deco... even thought being her first time even seeing fondant...:) Thank u Hetal... we do make a great pair...:D

Cute isnt it? My experience with fondant was good..:) I was kind of blank first about how to design the top of the cake... I have never done icing before this...(using the tip and buttercream and all....never done that) I have worked with fondant earlier....(Once I made a bow on top of the cake using fondant...:) and this is the second time I am working with it... It was so nice.. specially making the baby and the baby stuff...:) it felt so nice and so cute. I am sure u will agree with that Hetal...:) isnt it?
Making the baby was the most fun... the hair and the pacifier of the baby was fun too.. though I wasnt sure that looks like a pacifier hehhe. My DH helps me and guided me on the shapes of the baby stuff.Over all it was a great experience and I am sure I am gonna try this fondant work again.:)
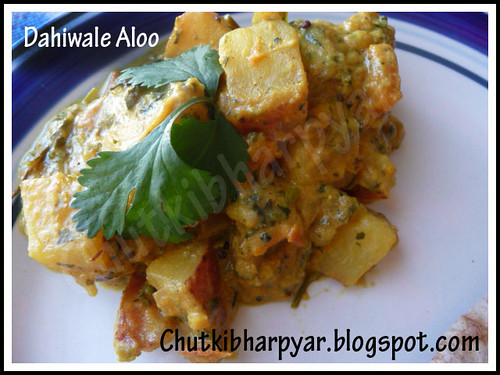
Anyways now going to the recipe of this cake. I ate this cake once in CPK when we went for Valentine's day and wanted to try it. So when I saw this recipe in Joy of baking site... I jumped and wanted to try it immidiately. So here goes the recipe of this yummy delicious soft and creamy cake....I am sure you will love this one.. as much as we all do..:D To make this cake you need...
Ingredients :
2 1/2 cups sifted cake flour
1/2 tsp salt
2 tbsp Dutch-processed cocoa powder (I used hershey's)
1/2 cup unsalted butter, at room temperature
1 1/2 cups Granulated Sugar
2 large eggs
1 tsp pure Vanilla extract
1 cup buttermilk
2 tbsp liquid red food coloring ( I also used the indian powdered food colour...:) alongside)
1 tsp white distilled vinegar
1 tsp baking soda
For the Cream Cheese Frosting: (this frosting is what give major flavour to this cake.)
1 1/2 cups heavy whipping cream
8 oz cream cheese, room temperature (1 packs philadelphia creamcheese will do)
8 oz tub of Mascarpone cheese, room temperature (As i didnt get mascarpone cheese, I used Cream cheese here too..)
3/4 tsp pure vanilla extract
1 cup confectioners' (icing or powdered) sugar
2 cups dessicated sweetened coconut for garnishing
Method:
Preheat the oven to 350 degree F.
Grease two 9" round cake pan. I used the Witon Cake release and it worked like magic for me.You can even line them with parchment sheet for easy or no clean work. Set aside.
In a mixing bowl sift together cake flour, salt and cocoa powder. Set aside.
In a bowl beat the butter, using a hand mixer till smooth for about 1-2 minutes. Add the sugar and beat again until light and fluffy. Add the eggs one by one, beating in between. Scrape the sides of the bowl and then go ahead and add the vanilla essence. Beat well until everything combines well.
In a measuring cup whisk together the buttermilk and the red food colour. Adding buttemilk to the cake gives it a moist and tender crumb. Buttermilk has a nice thick creamy texture with a rich tangy buttery taste that makes baked goods tender and soft. While keeping the mixer on a low speed alternately keep adding the flour and the buttermilk mixture in 3 additions, begining and ending with the flour. Mix well.
In a small cup mix the baking soda with the vinegar. Allow the mixture to fizz and bit and then quickly fold it into the cake batter and mix well.
Now u have to be quick and divide the batter into the two greased pans. Smooth the tops of the batter with a spatula or spoon. Bake in the preheated oven for Aprroximately 25-30 minutes or until the toothpick inserted in the cake comes out clean..( mine cooked in approx 25 minutes.) See that u dont over cook the cake orelse the sides will burn and become hard. Once the cake is nicely baked...take it out of the oven and let it cool in the pan on the cake / wire rack for 10 minutes. Invert the cake on the cake rack and let it cool till room temperature. Once its a bit cool place it in the freezer for atleast an hour or so (this is done to make filling and frosting the cakes easier.)
In the meantime prepare your cream cheese frosting for the cake. In a bowl, using a hand mixer process the cream cheese and the mascarpone cheese ( I used cream cheese instead and its didnt make any difference to the taste..) until smooth. Add the Vanilla extract and confectioner's sugar and beat well. (Be sure u use confectioner's sugar...I used granulated sugar by mistake and my frosting ended up being a bit drippy...:P I did manage to correct it... but please dont do that mistake and be careful..what sugar ur adding..)
In another bowl take some whipping cream and beat it well till stiff peaks are formed.Now quickly but gently fold in some of the whipped cream into the cream cheese to make it light.Beat gently.You can actually feel the cream cheese frosting becoming light and fluffy. Add the remaining whipped cream in 2 seperate additions ,beaten well in between. If the frosting is not thick enough to spread, cover it and place it in the freezer for an hour or until it is thick enough to spread.
Now moving to the assembly of the cake...
To assemble cut each layer of the cake horizontally with the serrated knife. I used the levelling tool from wilton.Did made my job so much easier. Check their Cake levelling tutorial
here.
You will now have 4 cake layers, top of the cake facing down on ur serving plate or cake circle.
Spread the bottom most layer with some frosting.Cover it completely. Place another layer of the cake on top of the frosting and continue covering it with more frosting. Do the same with the rest of the cake layers. Once all the layers r done. Frost the top and sides of the cake with the frosting. Once u have put one coat of the frosting, keep the cake in the freezer again for 1/2 and hour. Now, take the cake out and frost it again with the left over frosting and then top it with some dessicated sweetened coconut. See that the coconut covers the top as well the sides of the cake. Now ur cake is ready to be eaten..:)
Or u can just go ahead and decorate it using fondant or icing...:) for a special occassion like the one I made this cake for...:)
Our dear and lovely friends...:)
When my friend saw this cake she was surprised and the look on her face was enough. it paid off all the effort we took to make this cake. Love u neha... hope u have a safe and easy delivery. just want to let u know that we all r eagerly waiting for the little one...:) as much u both are..:D god bless you.! Hope u all wish her the same...:)
God bless the mommy and Daddy-to-be...:)
 Method :